How Smart Lead Sellers Use Conditional Form Redirects to Simplify Routing (And Why It’s a Huge ROI Booster)
If you’re a lead seller (or even an agency) that distributes leads to clients, you already know that post-submit experiences matter.
If you’re a lead seller (or even an agency) that distributes leads to clients, you already know that post-submit experiences matter.
It’s the key to increasing contact rates, after your lead submits your form.
And most forms give you a basic thank-you page redirect and that’s fine, if you’re only handling leads for one brand.
But what if you’ve got dozens or even hundreds of buyers that you need to route leads to?
And what if you want to redirect each lead to a specific landing page… one that’s branded for the client, shows their logo, has their contact information, and maybe even their phone number on the button to increase connection rates?
This surely becomes a real headache to manage at scale. 🤕
But this is where conditional redirects come in to save the day.
With conditional redirects, you can do this all automatically with just one lead form (rather than many), AND without spinning up dozens (or hundreds) of custom thank-you pages.
This is what we’ve found the top lead sellers are doing to save and maximize their buyer’s connect rates.
This results in perceived higher-quality leads (thanks to increased contact rates), reduced Cost Per Lead, and a boost in ROI, making it a significant competitive advantage.
Let’s dive into conditional redirects and how they work.
What is a Conditional Form Redirect?
When a lead fills out a lead capture form, it’s typical to send them to a standard thank-you page or confirmation message. But in the world of lead generation and lead selling, one-size-fits-all doesn’t cut it.
Instead, many lead sellers and agencies want to redirect leads to a client-specific landing page after the form is submitted, based on who the lead was sold to or matched with.
This is a conditional or dynamic redirect.
Why Conditional Form Redirects Set Lead Sellers Apart from the Rest
- You can improve contact rates by showing the client’s phone number, branding, or calendar link immediately after submission.
- It builds trust with the lead, by confirming which company will contact them.
- It creates a tailored user experience without forcing the client to create their own lead capture flow.
- It helps you stand out as a high-quality lead provider with better handoff experiences.
- It improves your lead capture workflow and lead gen ops.
- If more leads are connecting with your buyers down funnel, then it increases your CPLs and ROI upstream.
Now before we dive into how to easily solve this, let’s take a look at how most do it.
How to Set Form Redirects Manually
The most common way agencies and lead sellers handle this today is with a manual approach.
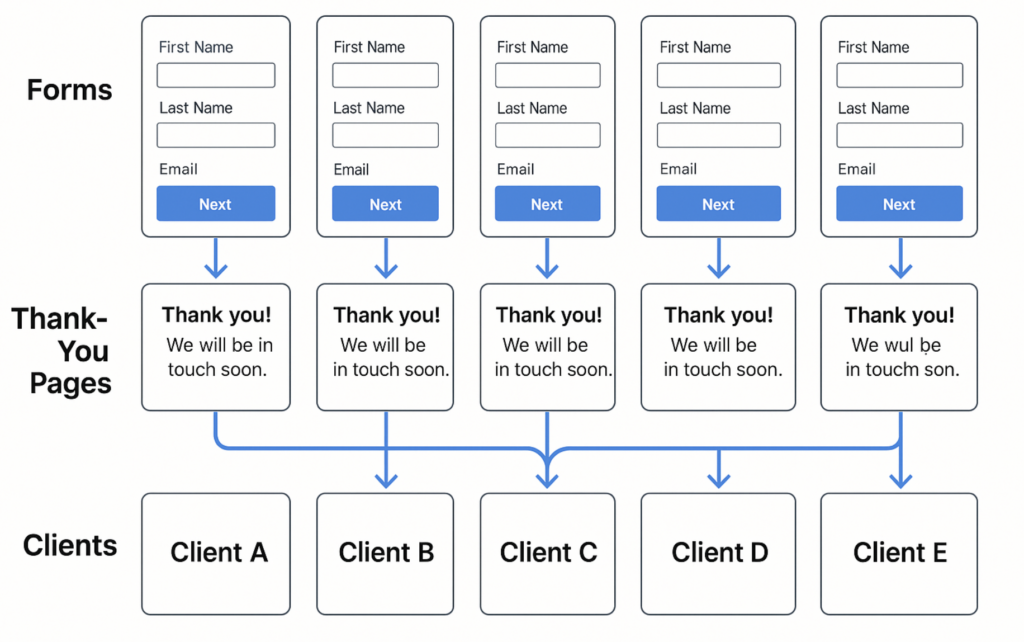
- Create one form per client or lead buyer
- Pair it with one thank-you page per client
- Redirect each form to its own landing page
This does work just fine. And it’s a great way to start. But it doesn’t scale.
For example, let’s say you’re routing leads to 20 clients. That’s 20 forms, 20 thank-you pages, and 20 different landing page flows to maintain.
Now imagine you’re routing leads to 50 or 100 different lead buyers or clients. That’s 50–100 forms, landing pages, and post-submit redirects.
Every time you need to make a change, add a new client, tweak copy, adjust tracking, you’ve got to do it across all of them.
It’s a massive ops headache, and it only gets worse as your lead volume or buyer network grows.
Which is why as you scale, you’re going to outgrow this method and will likely need the conditional redirect approach.
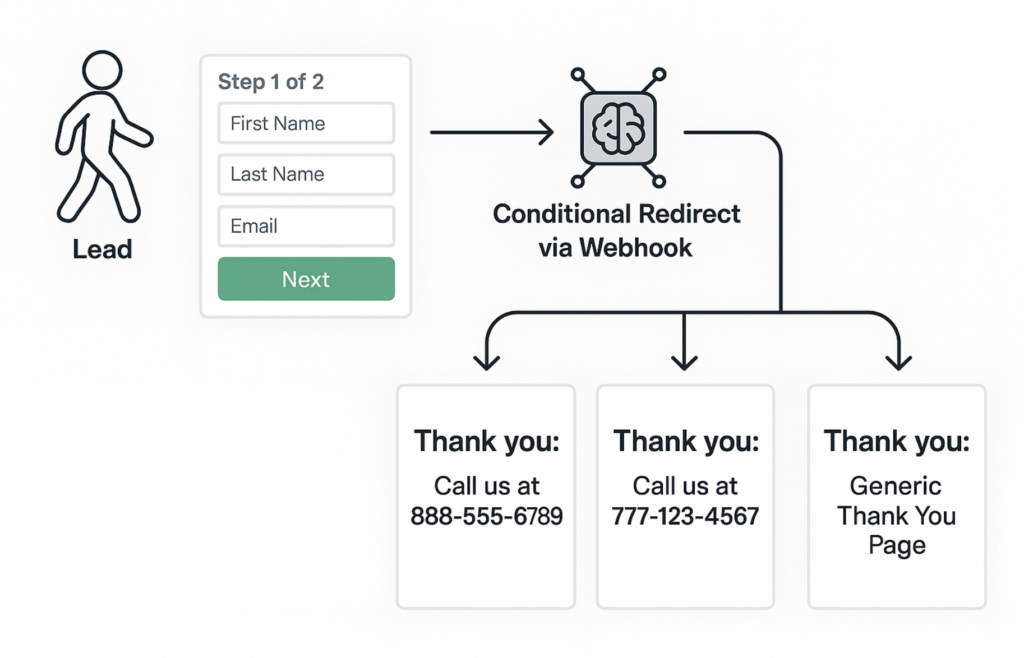
The Automated Way: Conditional Redirects Using a Webhook Postback
There’s a much smarter way to do this, one that doesn’t involve creating 50+ forms or hard-coding redirects into your pages.
Here’s how it works:
When a lead submits a lead form, your lead distribution platform (like LeadProsper or Leadspedia, or LeadByte) immediately processes that lead and returns a postback response, including a redirect URL for the matched client.
Your lead capture platform (like LeadCapture.io) listens for that postback and conditionally redirects the lead to the correct page based on the response.
Boom. One lead form. Many destinations.
Let’s walk through exactly how to set it up.
How to Set Up Conditional Redirects with LeadCapture.io + Your Lead Distribution Tool
Here’s how you can implement this setup using LeadCapture.io as your lead form, and a lead distribution platform..
Step 1: Use a Lead Distribution Platform
This approach requires that you’re using a tool like LeadProsper, Phonexia, Leadspedia, LeadByte or something similar that supports real-time lead postbacks.
The key is that your distribution platform can send back a redirect URL in the postback response based on who the lead was matched with or sold to.
This is often returned as a field like redirect_url or post_submit_url.
Step 2: Set Up a Single Lead Capture Form Inside LeadCapture.io
Rather than creating one form per client, set up one lead capture form for your vertical (e.g. solar, mortgage, legal, etc.) inside of LeadCapture.io.
This is the master lead form that all your traffic will flow through.
You can still make it dynamic and personalized with hidden fields, pre-filled values, or query string parameters, but you don’t need multiple versions for each client/buyer.
Step 3: Configure Your Webhook to Send Leads to Your Platform
In LeadCapture.io, go to your Webhook settings and configure the form to POST leads to your distribution platform.
This is where you send the lead data (name, phone, zip, etc.) to your lead distribution tool of choice.
Once submitted, your lead platform will run its logic (e.g. lead scoring, routing, buyer matching) and return a postback response. Note: there are more than likely some settings that will need to be set on your lead distribution side to enable the postback redirect URL.
Step 4: Identify the Redirect Field
Once your webhook is configured, submit a test lead. Then, within your LeadCapture.io account, go to the lead details page and select the specific lead. Scroll down to find the section displaying the full webhook response from your receiving system. Here, you’ll locate the redirect URL field.
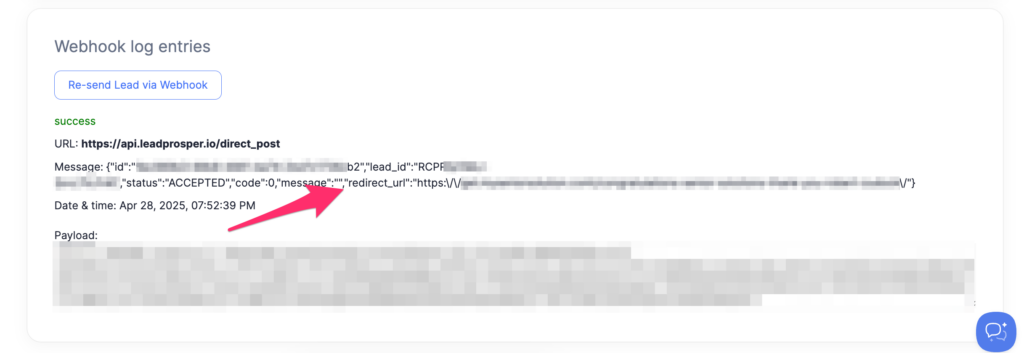
In this scenario, you will find that the ‘redirect_url’ field reflects a URL provided by LeadProsper.
This is the field that tells LeadCapture.io where to send the user next.
Now copy this field and let’s map it within the webhook.
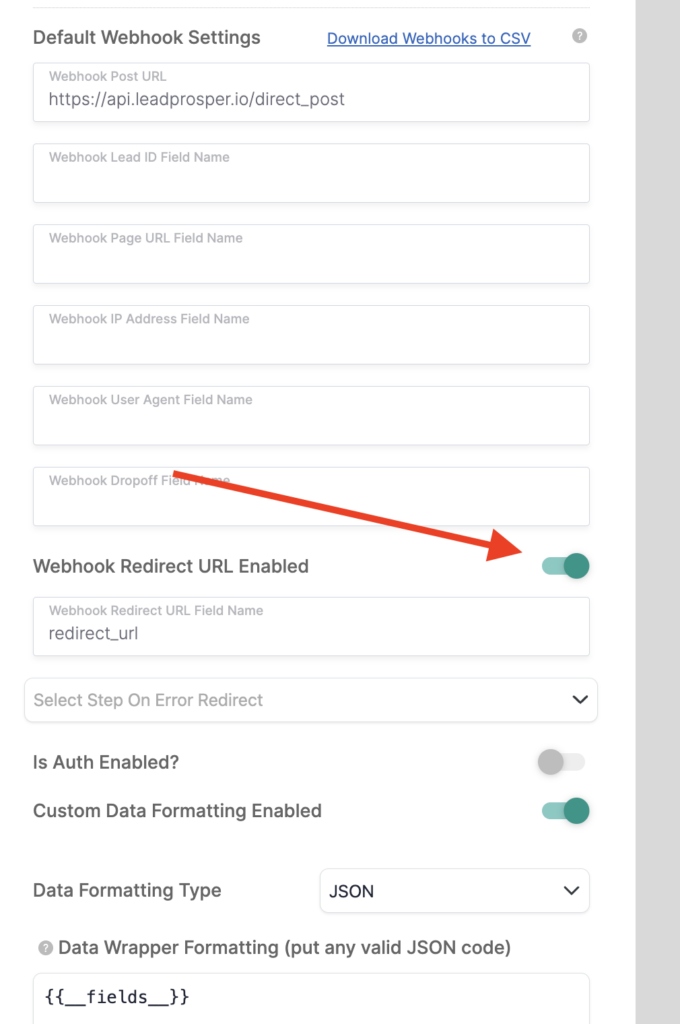
In the Webhook section, toggle the “Webhook Redirect URL Enabled” option to activate it, and then input the value you previously copied into the “Webhook Redirect URL Field Name,” which is redirect_url in this scenario.
And just like that, your dynamic redirect is all set!
Step 5: Handle Disqualified Leads or Missing Redirects
Not every lead will be matched or sold.
So what happens if the postback doesn’t include a redirect URL?
No problem. Just create a fallback step or DQ (disqualified) thank-you page in LeadCapture.io. Then set it from the drop down on the ‘redirect error’ step.
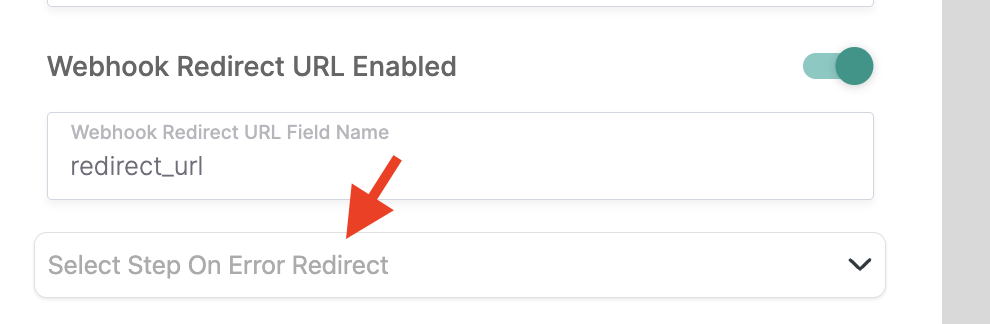
You can set this up as the default “thank-you” step when no redirect URL is available.
This ensures every lead has a clean and complete journey, even if they weren’t matched.
Step 6: Go Live
Once everything’s configured, publish your lead form and go live.
Now every time a lead is submitted, LeadCapture.io will:
- Send the lead to your distribution tool via webhook
- Receive a real-time response that includes the appropriate redirect URL
- Instantly redirect the user to the correct client’s landing page
It’s fast. It’s seamless. And it’s completely scalable.
A Few Pro Tips
- Test with real responses — Always make sure the redirect_url is being returned correctly and is accessible. A broken redirect kills the flow.
- Use hidden fields for tracking — You can still track source, campaign, or UTM parameters by passing them through hidden fields or URL params.
- Log fallbacks — Make sure you track when a fallback redirect is used. This helps you identify leads that weren’t matched and may need follow-up.
- Use lead distribution based on form data — If you’re not already using ZIP codes, verticals, or other data points to route leads in your platform, you should. It powers smarter redirection.
- Keep client URLs up to date — Make sure your clients are maintaining their landing pages. Or better yet, setup one landing page and load everything dynamically so you can have one lead form and one landing page!
Final Thoughts on Using Smarter Redirects Start with Webhook Postback
This approach is definitely the best way to take your lead generation to the next level as your business grows.
By tweaking a few settings in your lead distribution tool and LeadCapture.io, you can ramp up efficiency and ensure your leads are directed to the most suitable client-specific landing pages.
If you run into any bumps or need a hand, why not kick off a free trial of LeadCapture.io and let us know how we can assist? We’re here to make sure everything runs smoothly for you!
Ready to capture more leads?
Build and optimize high-converting lead funnels, quizzes, and forms with AI-powered lead capture software.
Start Free Trial