How to Build An AWESOME Multi Step Form That Gets Results (In-Depth Tutorial)
Multi step forms (also sometimes referred to as multi page forms) are all the rage today.
Multi step forms (also sometimes referred to as multi page forms) are all the rage today.
In fact, Google is filled with dozens of blog posts touting the benefits of using a multi step form.
But oddly, I can’t find a single post that shows you how to actually set up awesome multi step forms in the first place!
That’s why today, I’m just going to show you how to actually build a high converting multi step form that gets results.
And don’t worry, we won’t be touching any code.
In this multi step form tutorial, I’m going to give you a peek into how I use multi step forms on one of our lead generation sites that we built in the pest control industry.
Since I used our own multi step form tool (LeadForms) on the site, I’m going to stick with using LeadForms in all of the examples throughout the post. If you’re using another form tool, then don’t worry, all of the concepts will still apply.
And finally, if you’re already a LeadForm customer, then think of this post as a best practice walk-through.
Okay, let’s get into it.
Contents
- Getting Started
- Lead Form Design
- Step Layout: The KISS Principle
- Site Placement: It’s About Engagement
- (Pro Tip!) How to Maximize Conversions
- Lead Delivery
Getting Started: An Example of a Multi Step Form In-Action
In early June, I created a new lead gen site in the pest control industry located here.
Here’s a bird’s eye view of how the main landing page looks.
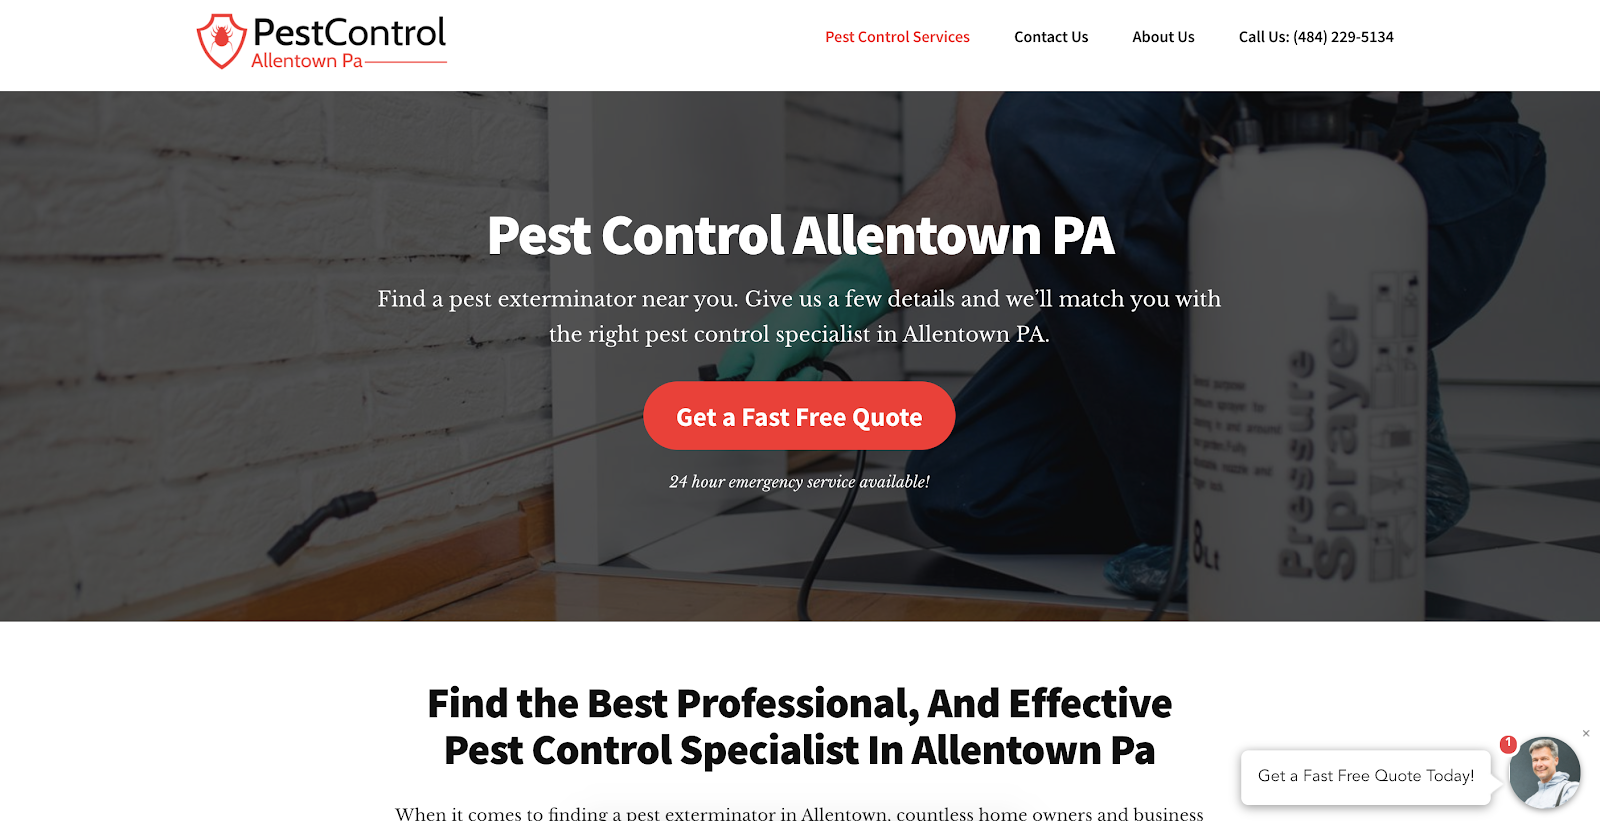
And here’s the lead form that I used (I’ll dive into this a bit deeper soon)
Although it’s still early, the conversion rate for this page is looking pretty good at +25%.
I still have a ton of work to do to get this page to rank and to build out the content, but it’s off to a good start and has generated some really good leads through some early PPC traffic.
Tools that I used to build the site and to make the multi step form include:
- Hosting: WP Engine – I’m a big WP Engine fan, mainly because their support is amazing.
- Theme: Genesis Pro by StudioPress
- Images: When it comes to images, Canva is the best thing since sliced bread.
- Phone Number: Callrail so I can redirect call leads to lead buyers
- SEO Software: Ahrefs — best SEO tool on the planet. I use them to do all of the keyword research and to track keywords in the SERPs
- For Lead Capture: LeadForms, which can be dropped onto any site — from WordPress and Clickfunnels to landing page builders like Instapage and Unbounce. You can grab a free trial here.
That’s all there is to it. No fancy landing page software or overly complex funnel. Between the theme and using my own tool, I was able to easily set up multi step forms in WordPress.
Now let’s cover form design.
An Awesome Multi Step Form Starts With Great Design
When it comes to the design of your multi step form, there are a number of different things that you can do.
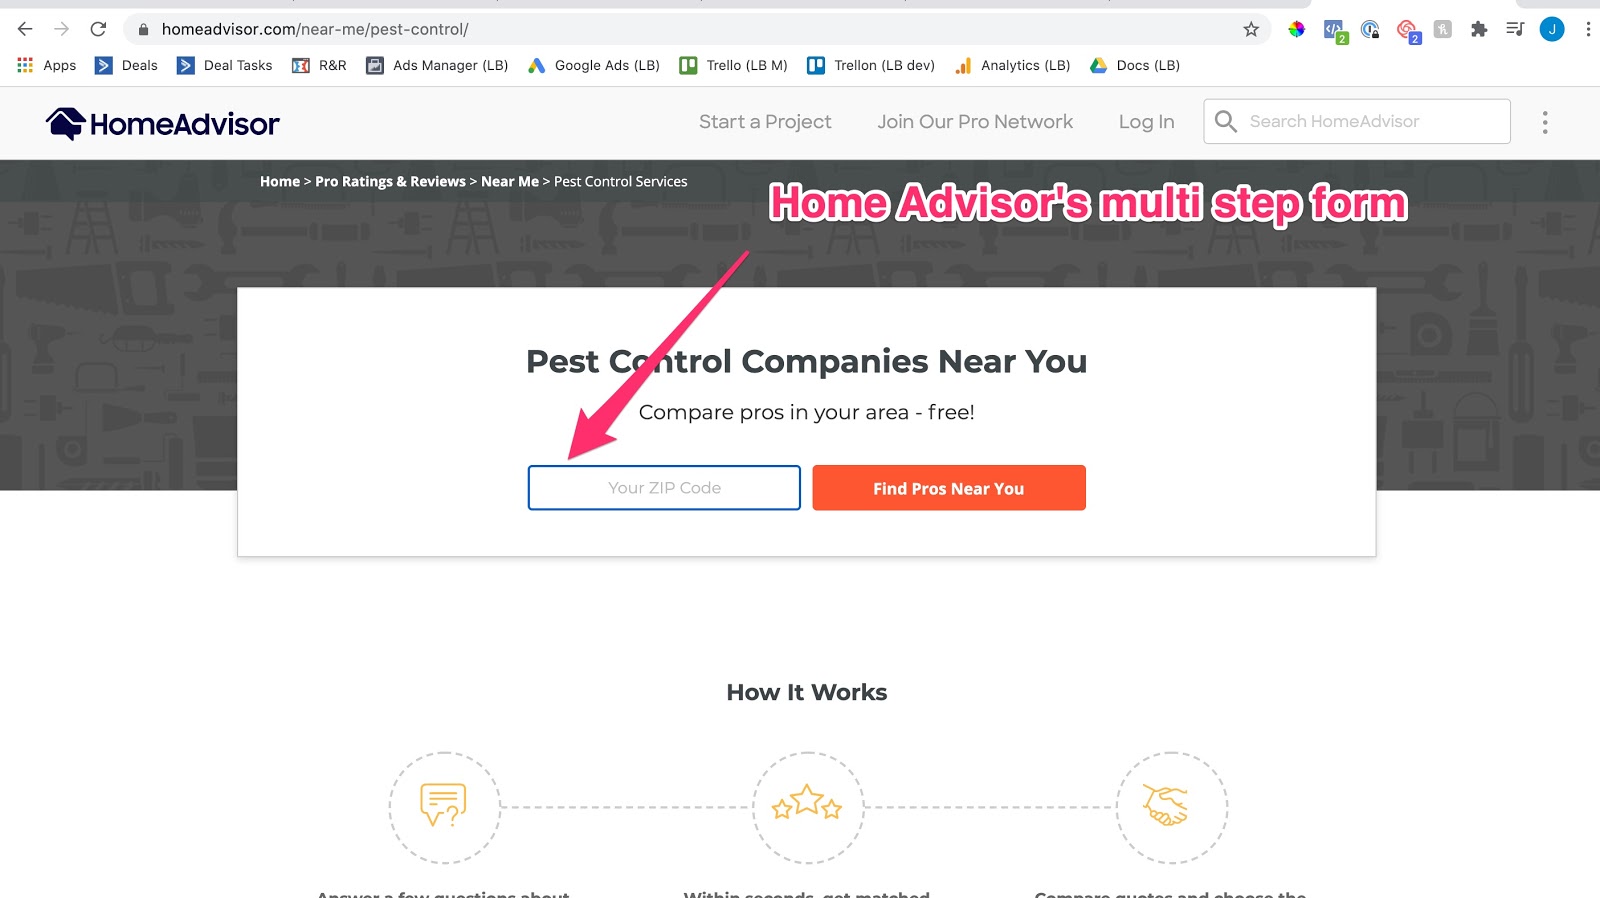
You can embed it right into your page, like HomeAdvisor:
Or, you can have it pop-up.
At LeadForms, we have a number of different form styles, ranging from multi step forms with background images to forms that look more like a chat widget in the image below:
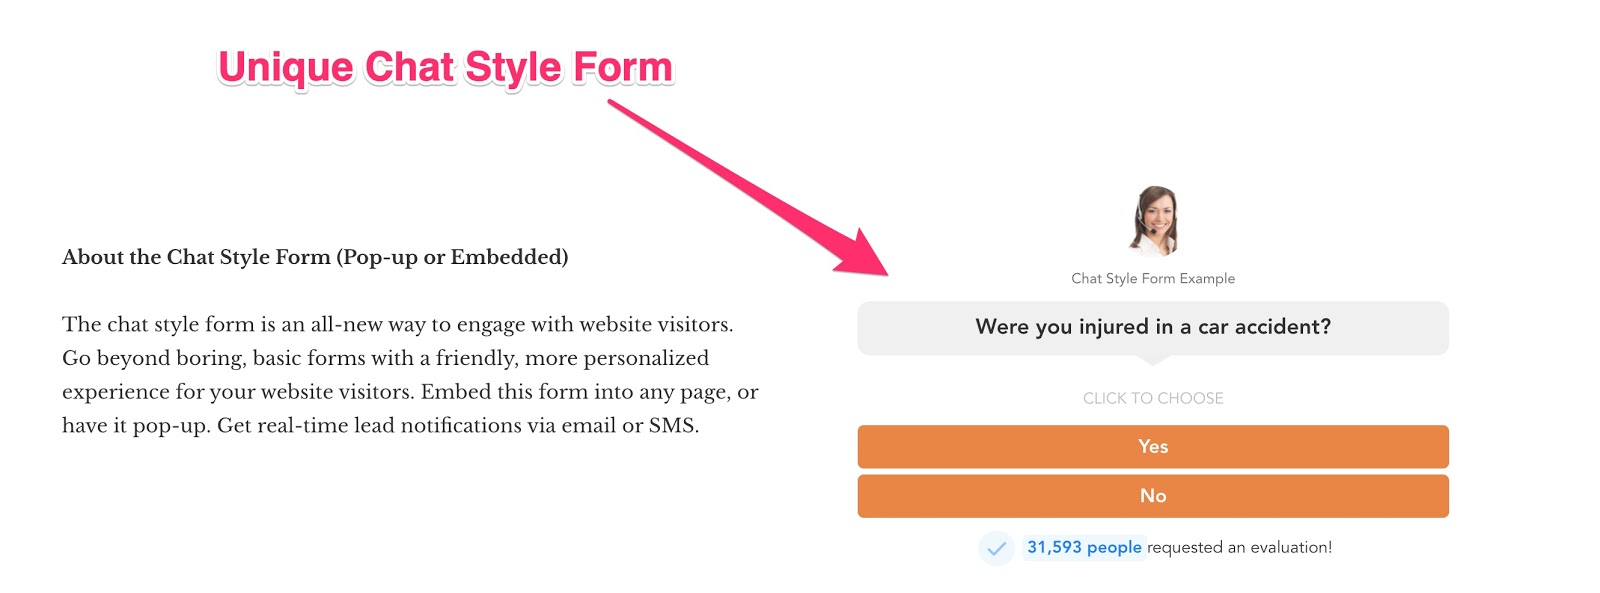
If you’re looking to set up a multi step form then I highly suggest browsing some of our multi step form examples for inspiration..
For my pest control site, I went with a nice big form with a background image, although I plan to A/B Test against other styles once traffic starts picking up.
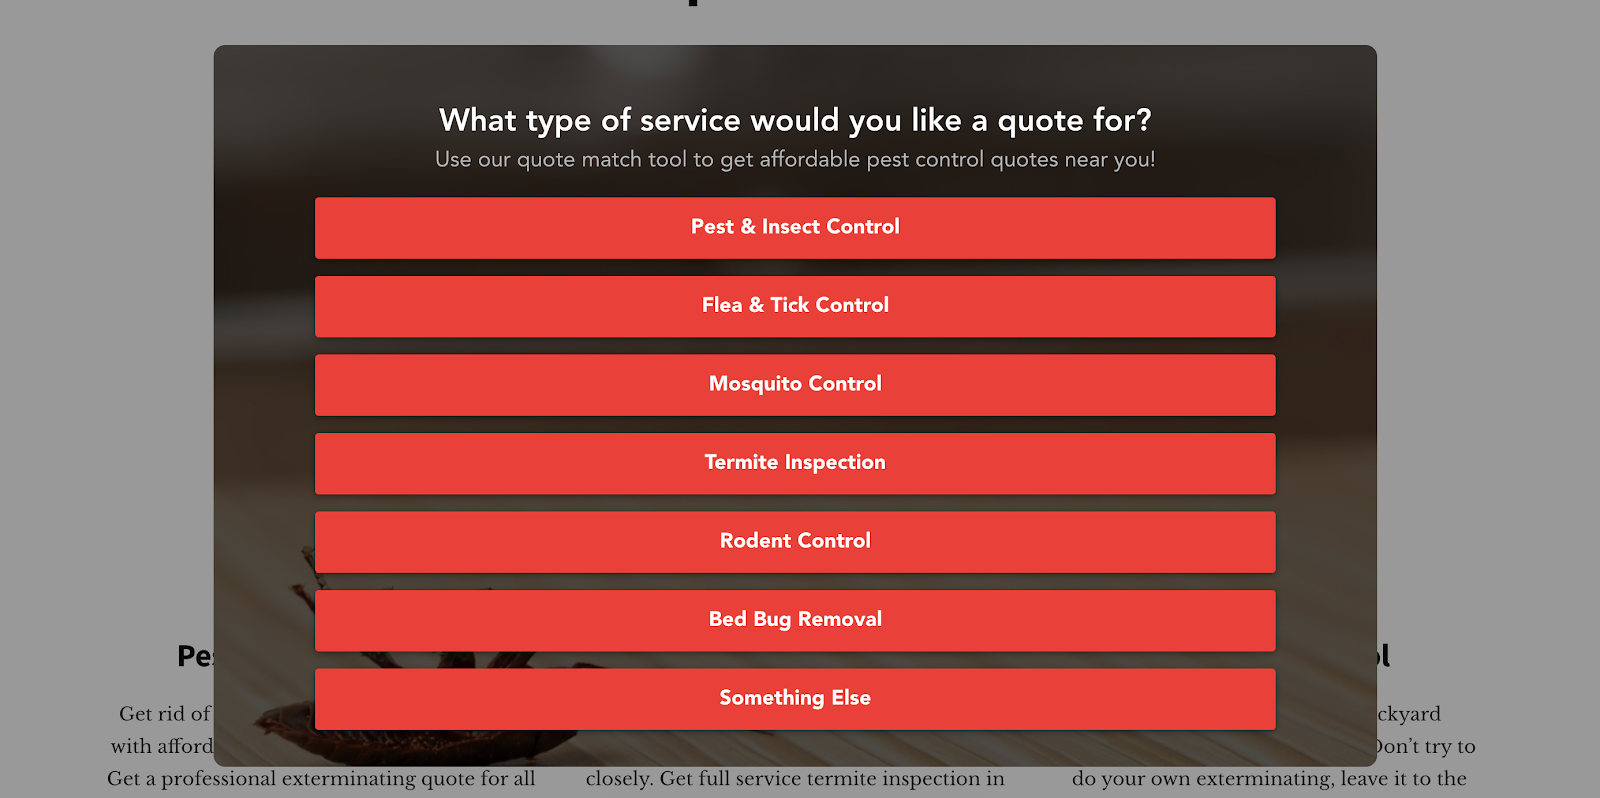
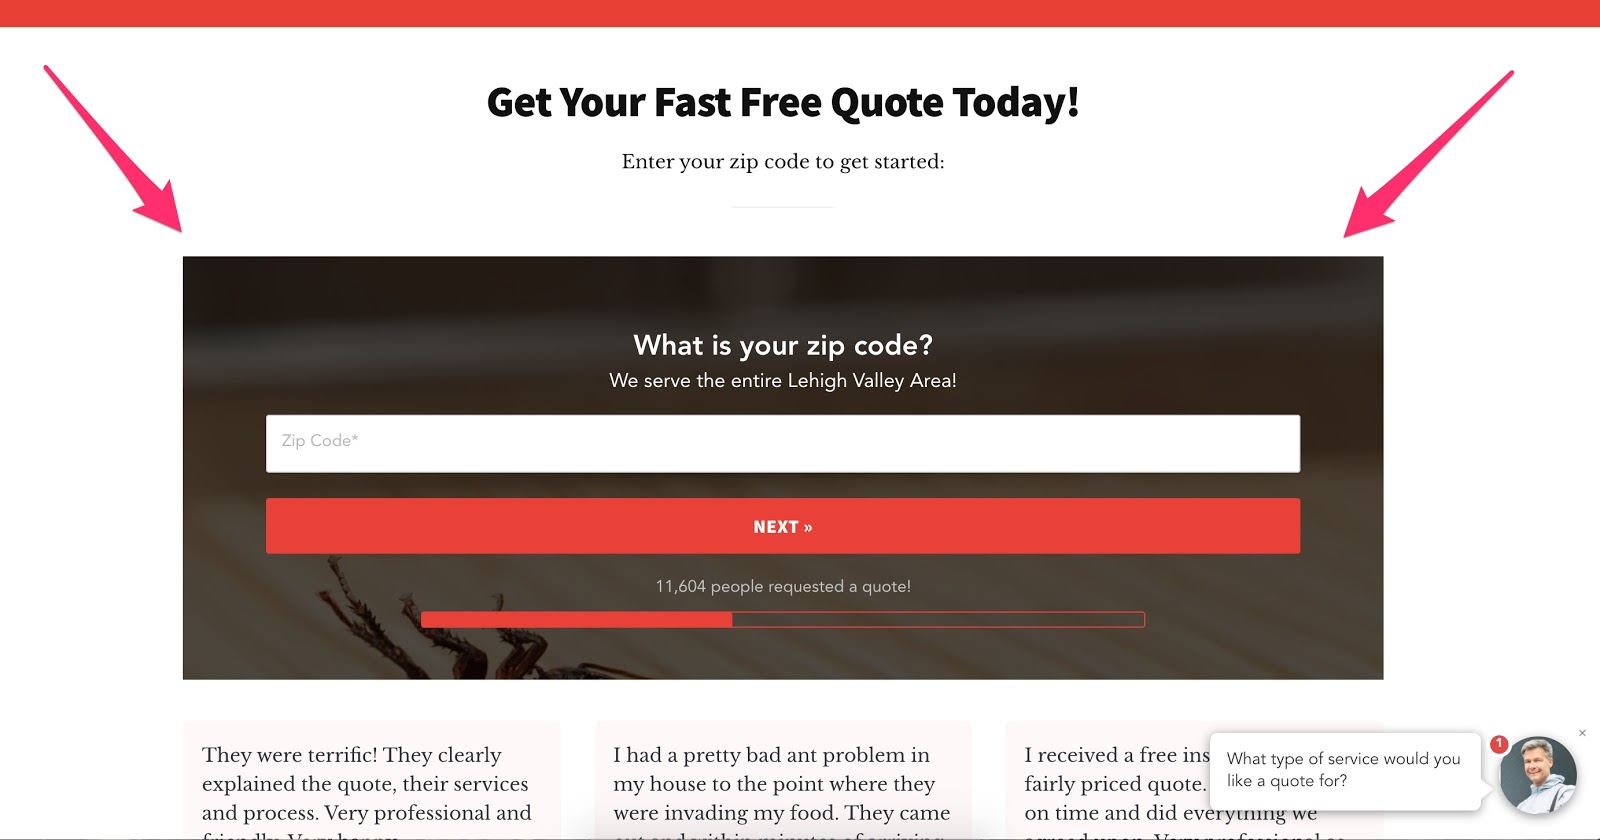
Here’s how the form looks as a pop-up:
And here’s how it looks as an embedded form:
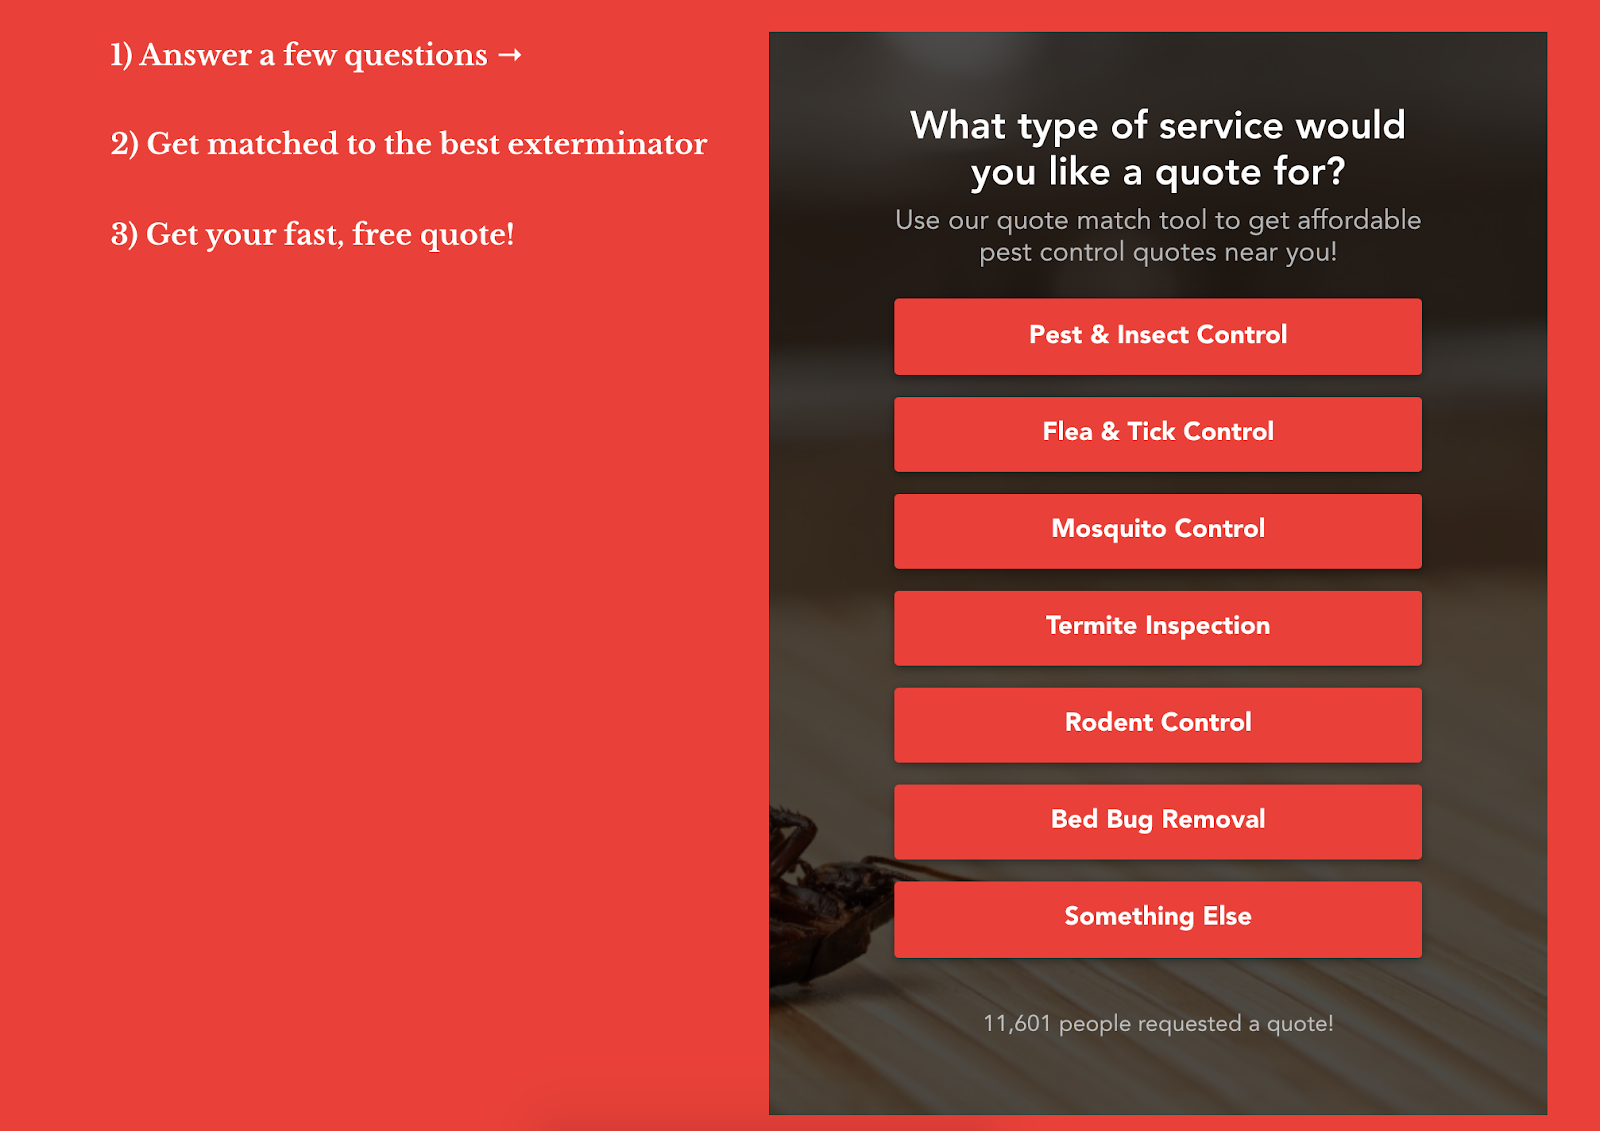
I positioned the form as a “Quote Match Tool” — just to make it a little more interesting to the website visitor
You may also notice that I put some thought into the design of this form:
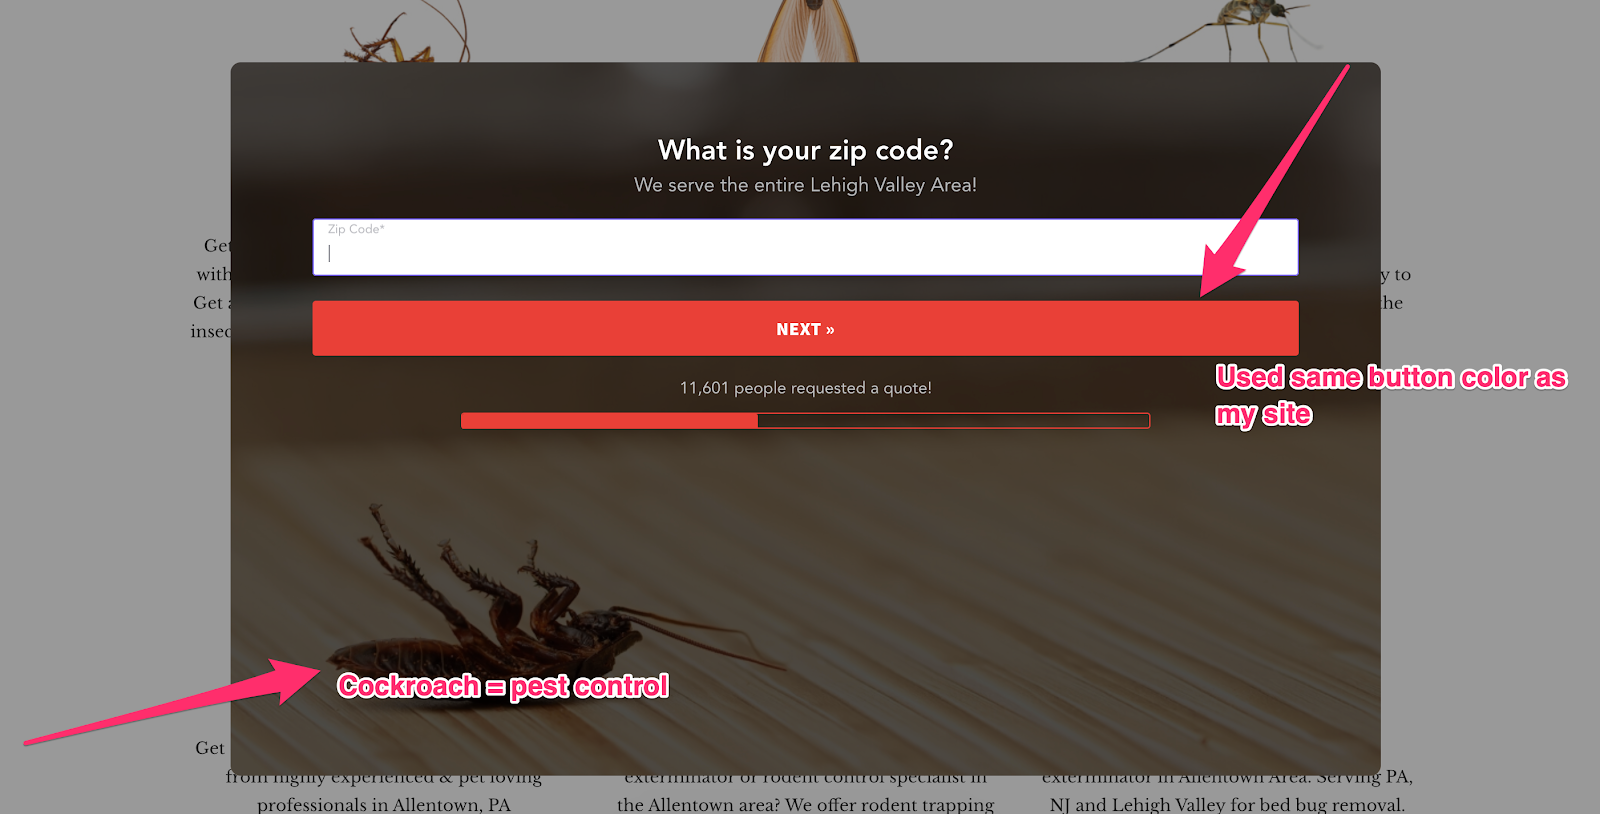
I matched the button colors to my site.
And for the background of the form, I found a nice image of a cockroach. Because well… nothing says “we’re the pest control company for you” better than an image of a cockroach laying back up on a table.
If you’re using LeadForms like me, then you can easily customize all of this inside of your Form Builder. Just follow the steps below to customize the design of your form.
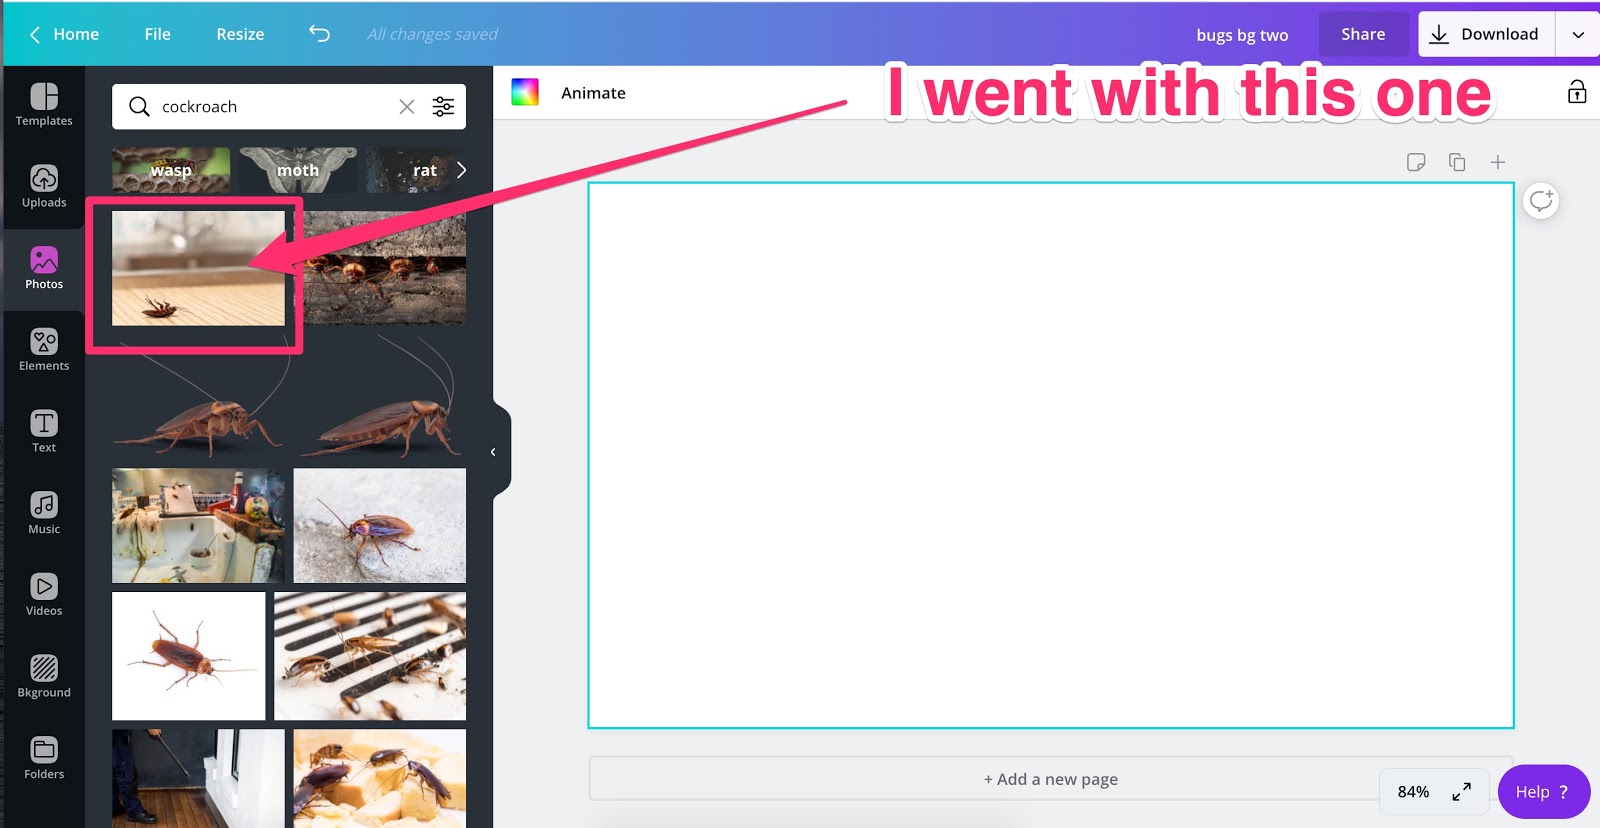
Step 1: Go to Canva and sign up for a free account (I’m on a paid plan but they have a great free plan as well)
Step 2: Create a new canvas and set the size to 975px by 575px
Step 3: Search for a photo
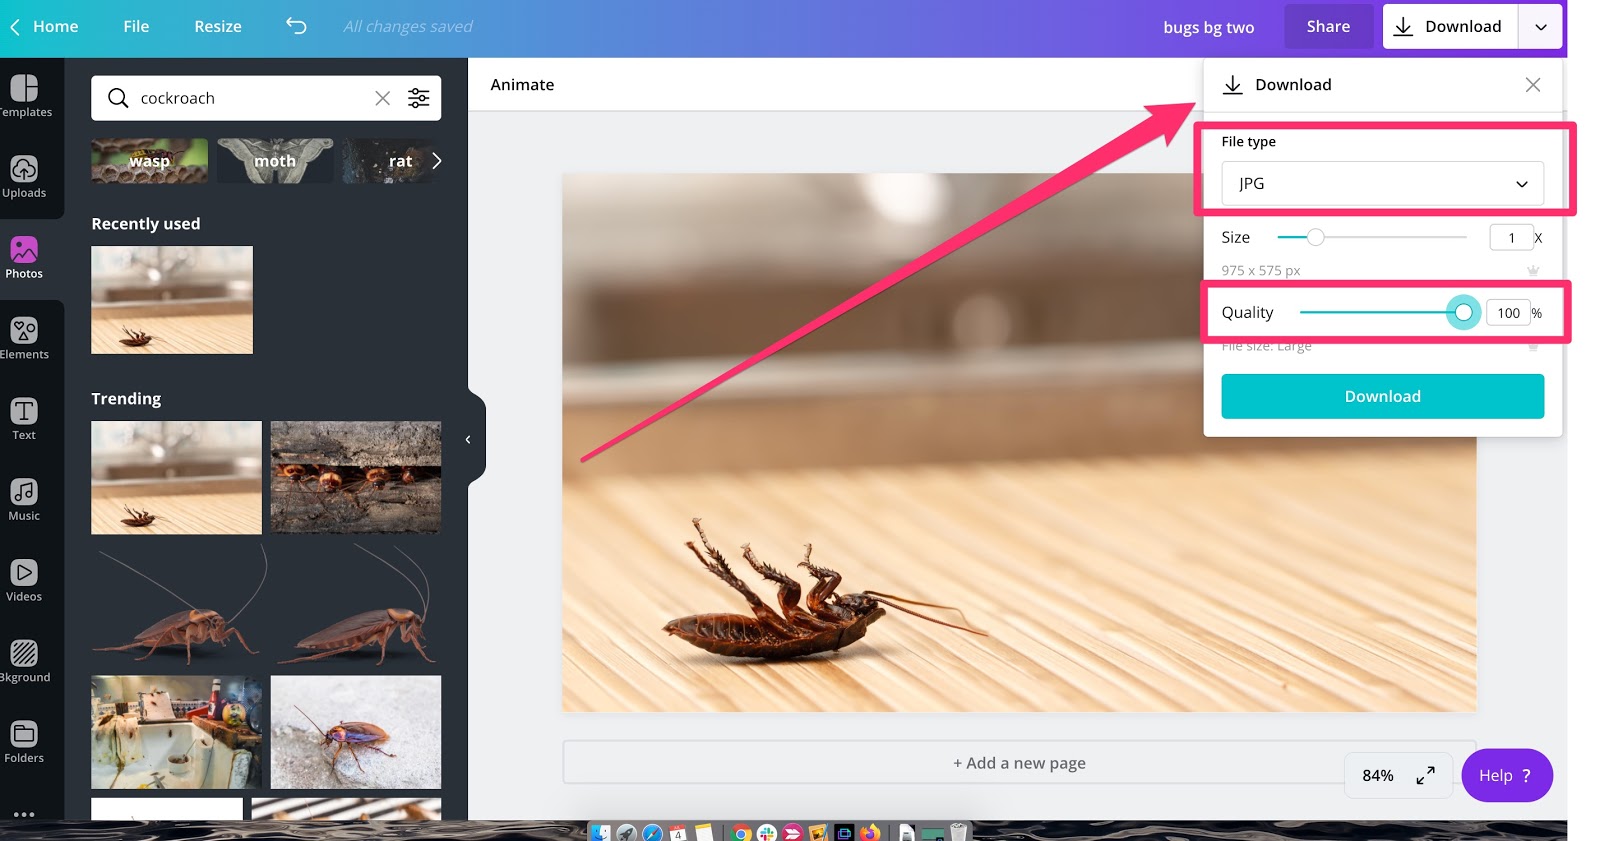
Step 4: Download the photo as a JPG and set the quality to high
Step 5: Go over to your form in LeadForms and upload the photo in the area where it says bottom background – here’s a snapshot from LeadForms’ multi step form builder.
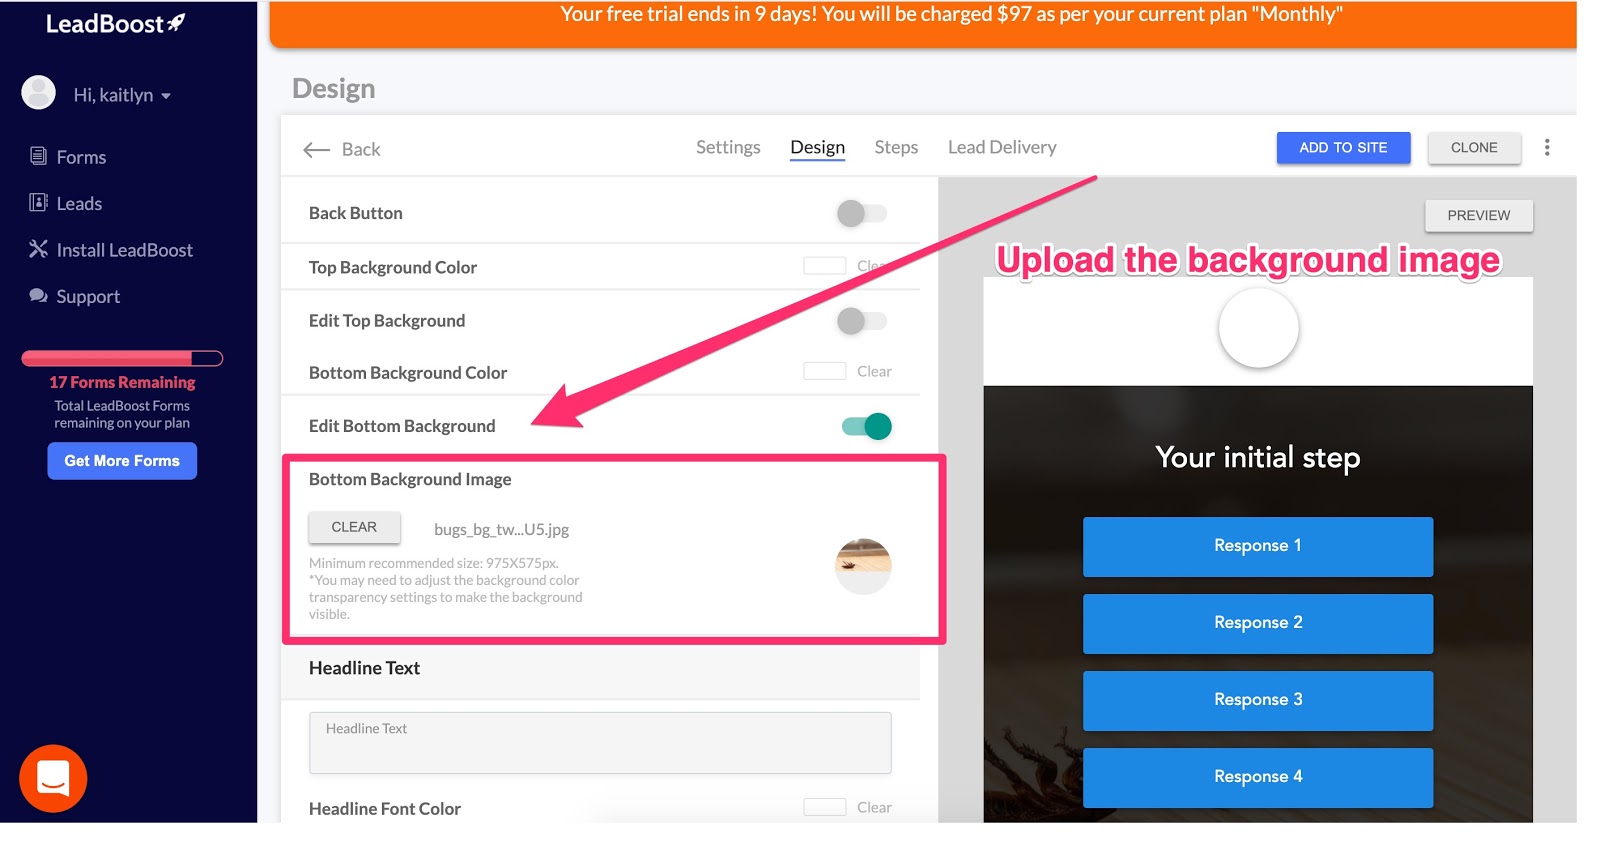
Step 6: Adjust your background transparency settings so you can see the image
!And just like that, you’ll have a nice looking image on your form.
For some best practices and inspiration, check out our blog post on contact form design.
Now that we’re done with the design of the form, let’s talk about the steps.
The KISS Principle For Setting Up Form Steps
No, not this type of kiss:

Source: giphy
I’m talking about the KISS principle.
KISS, is an acronym for “keep it stupid simple”. It’s a design principle noted by the U.S. Navy in 1960.
Simply put, the KISS principle states that systems work best when they are kept simple, rather than made to be overly complicated. Therefore, unnecessary complexity should be avoided.
When it comes to building multi step forms, I like to follow the KISS principle.
Here are some ways to keep it simple:
- Start out with a simple question for engagement
- Keep the form short usually with 4-5 steps max
- Ask for key contact info all on the same step
- Use multi step form with progress bars, social proof, and other elements to make the prospect feel like the end is near
Here’s the exact step layout that I used in my form:
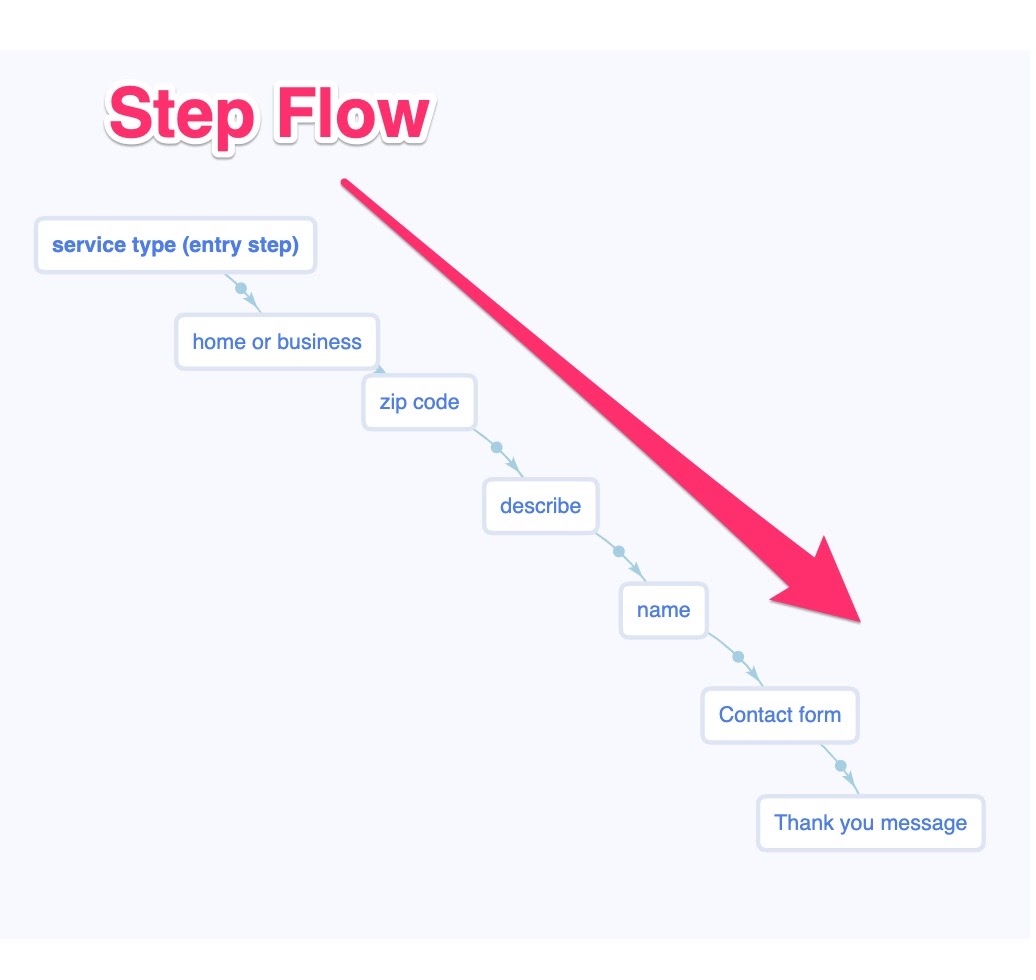
This visual is pulled right from the LeadForms, where we provide you with this nice visual flow that shows you how your form is laid out and how all of the steps connect.
Steps include:
- Service type / problem
- Prospect type (home or business)
- Location (zip code)
- Describe the issue
- Name
- Contact form (email and phone number)
And here’s how it looks as the prospect goes through the form:
!
In my experience, it’s better to ask a simple question first, rather than asking for personal information like a name or email address in the first step.
The idea here is that you should get the prospect engaged, then pull out the big guns and ask for a name, email, and whatever other personal details you need to ask for. There’s a ton of psychology behind this, but I won’t go into that right now.
This wraps up the section on form design and layout. If you like this setup then you can get this exact template inside of your account and customize it to make it your own.
Now let’s talk about where I placed the LeadForm on the actual site.
Make It Easy For Visitors To Find & Engage With Your Lead Form
Just having a multi step form won’t guarantee that you’ll get leads. The next step is to make it easy to find and engage with your form.
The key thing here is to drive as much engagement as possible.
Generally speaking, the more people that engage with your form, the more leads you’ll get.
In this section, I’m going to show you exactly where I placed the form on my site.
Form Placement
I added the form to the following areas on the site (I consider this the ideal placement).
1) Above the fold as a click-popup
The term “click-pop” means that the form will open with the click of a button.
And the “above the fold” area of a landing page is the top part of a page that’s visible without scrolling. This is usually the first thing that the visitor will see when they land on your page.
Here’s the form added right to the “above the fold section” as a click-pop.
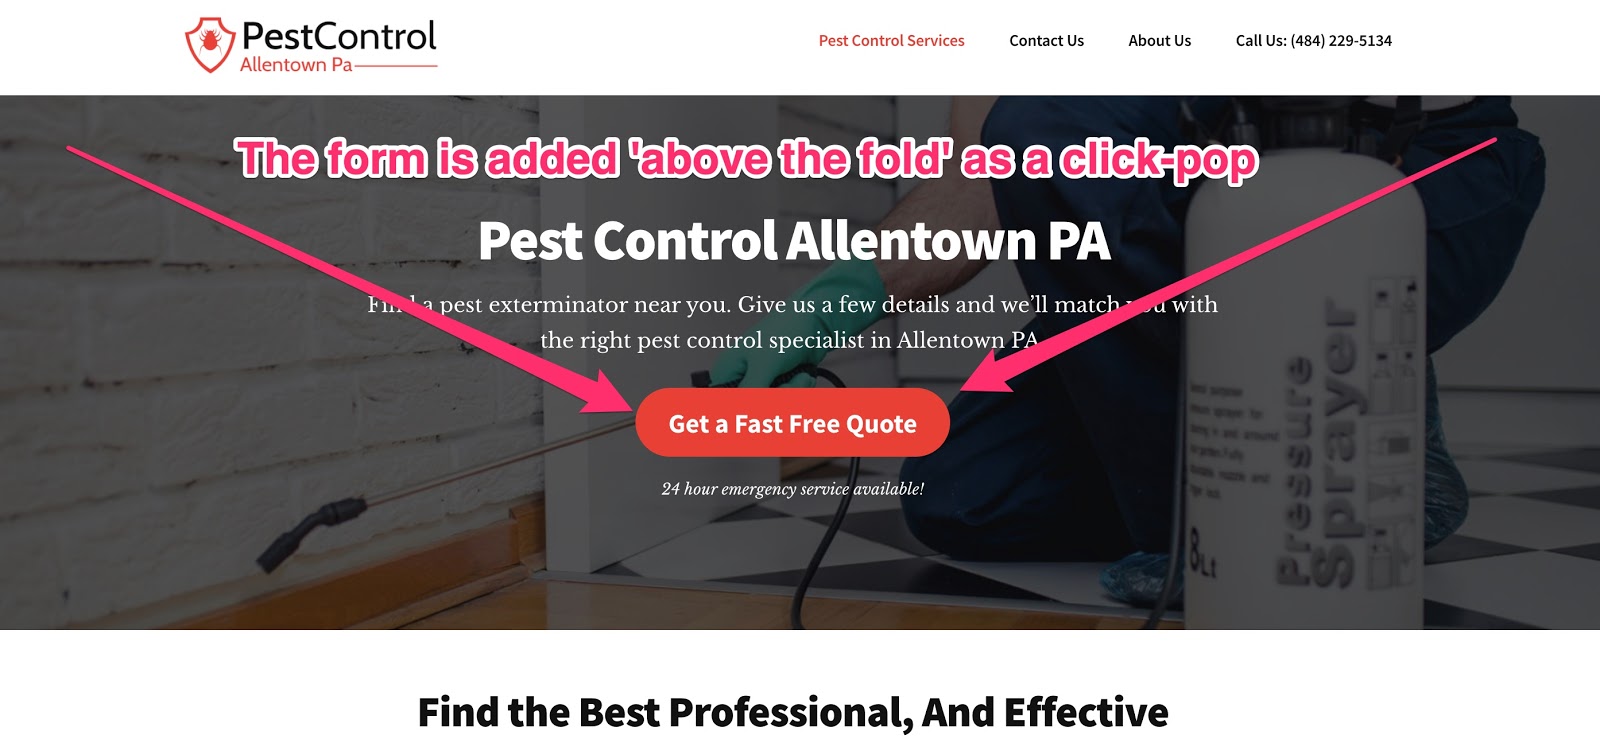
Simply click on the big red “Get a Quote” button and the form opens right up.

2) Embedded into the middle of the page
As you scroll down the page, you’ll notice that my LeadForm is also embedded right into the middle of the page.
I took the very same form, and I plopped it right into the page, below the services section. This is just another way to make it easy for the prospect to engage with the form without having to scroll around the site.
3) Bottom of the page
I also added the form to the bottom of the page like this:
Again, just another way to make it easy for someone to access the form and request a quote.
4) Onsite Message
In addition to embedding the form into the page and adding the form as a click-pop, I’m also using an on-site message like below:
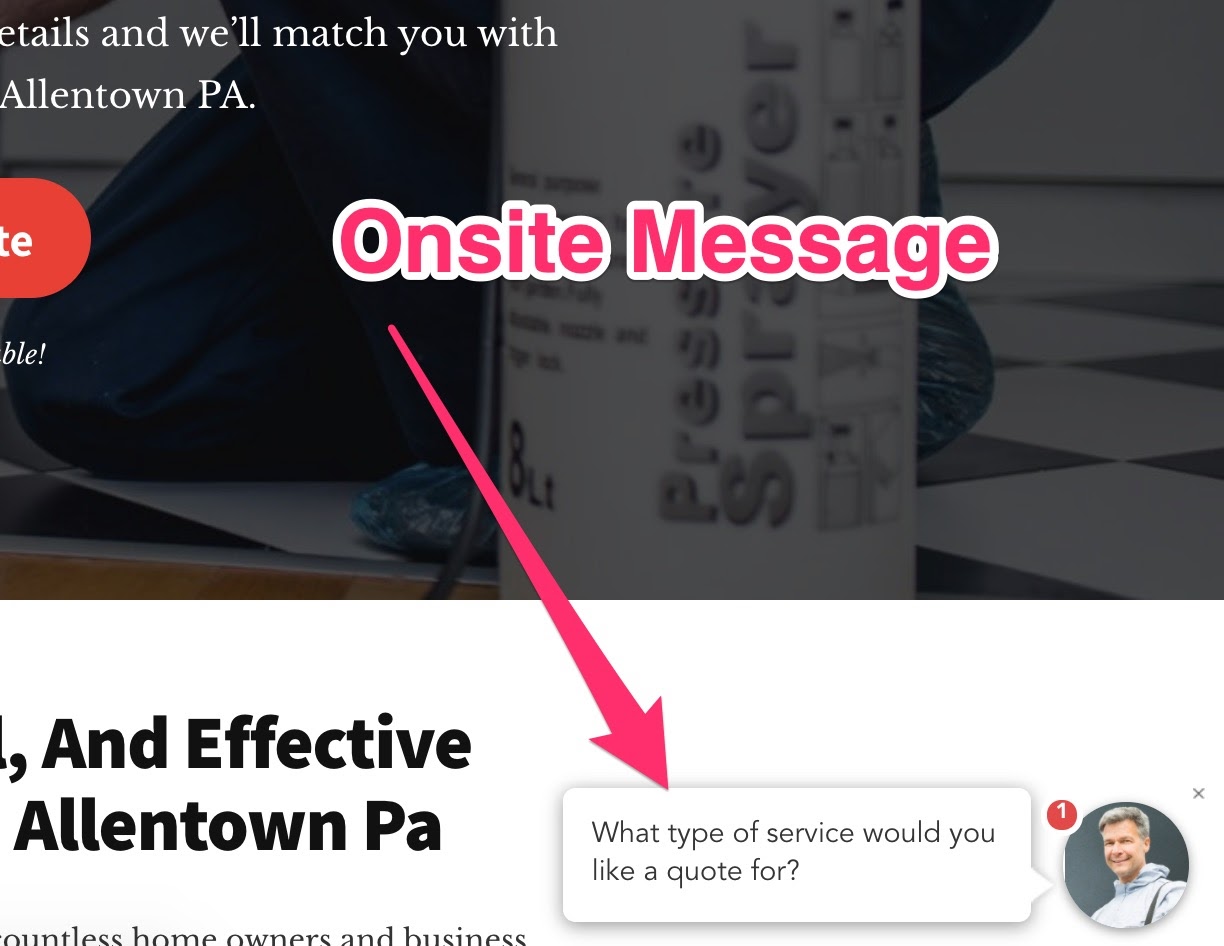
When clicked, the form will pop open.
The only caveat here is that if you’re not a LeadForms, then I’m not sure how you would implement something like this since the on-site message is a feature that’s somewhat unique to LeadForms.
It looks very much like a live chat widget, but instead of opening up a chat, it will open up the form. This is actually a great live chat alternative if you don’t have the desire or resources to have live chat on your site.
The onsite message feature can easily be turned on or off.
I prefer to keep the onsite message turned-on because I find that it helps drive some additional engagement, but whether or not you want to use it is completely up to you.
5) Finally, the form will also automatically pop-up
Oh no, we aren’t done just yet.
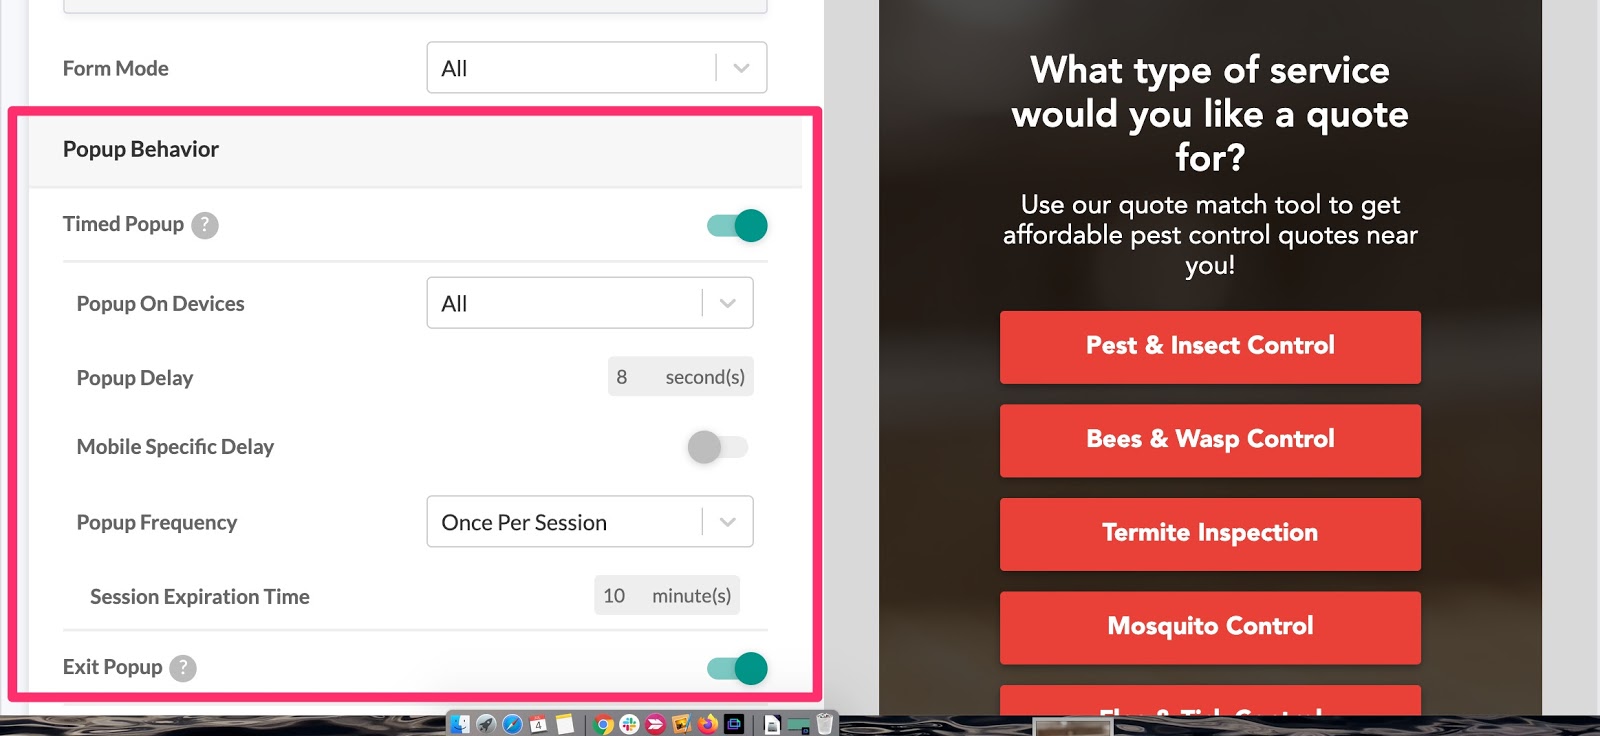
In addition to all of the above placement options, I also set my multi step form to pop-up and engage the user.
LeadForms (like the one in this example) come with timed pop-up and exit intent technology built-in.
You can even segment pop-up settings at the device level (i.e, all devices or desktop only).
Now, I know that pop-ups get a bad rap.
Some people think that pop-ups can be annoying.
I tend to agree with that.
But they work.
My advice is to use pop-ups, but be smart about it and think about the type of site that you’re marketing:
For example, if the site is a service business like a pest control site, then it makes complete sense to use pop-ups since people don’t usually go to a service site to consume content. You can afford to be a little more aggressive.
However, if you’re marketing a SaaS tool or an ecommerce site where the customer journey is a bit different, then you should be more mindful of the impact that pop-ups may have on the user experience.
Finally, although pop-ups can be perceived as pesky, there are things that you can do to make them less annoying.
For example, after someone dismisses the pop-up it’s usually a good idea to not show the same pop-up for a period of time.
You can control this setting inside of LeadForms by choosing the option “once per session”

This option tells the system not to display the same pop-up again during the user’s session.
How to Maximize Conversions For Your Multistep Form [Pro-Tip]
One really great way to maximize conversions is to match the forms to your service or product pages.
For example, if you’re marketing a service business like in the example throughout this post then your implementation may look like this:
- One general form on the home page, contact pages, blog posts, and other general pages
- More targeted forms for service pages like termite control, bed bug control, wasp and bee control and so on
Let’s take a look at an example.
In my example site, I used a pretty general form since all I know at this point is that the visitor is interested in a pest control service — I don’t know which service they are interested in yet.
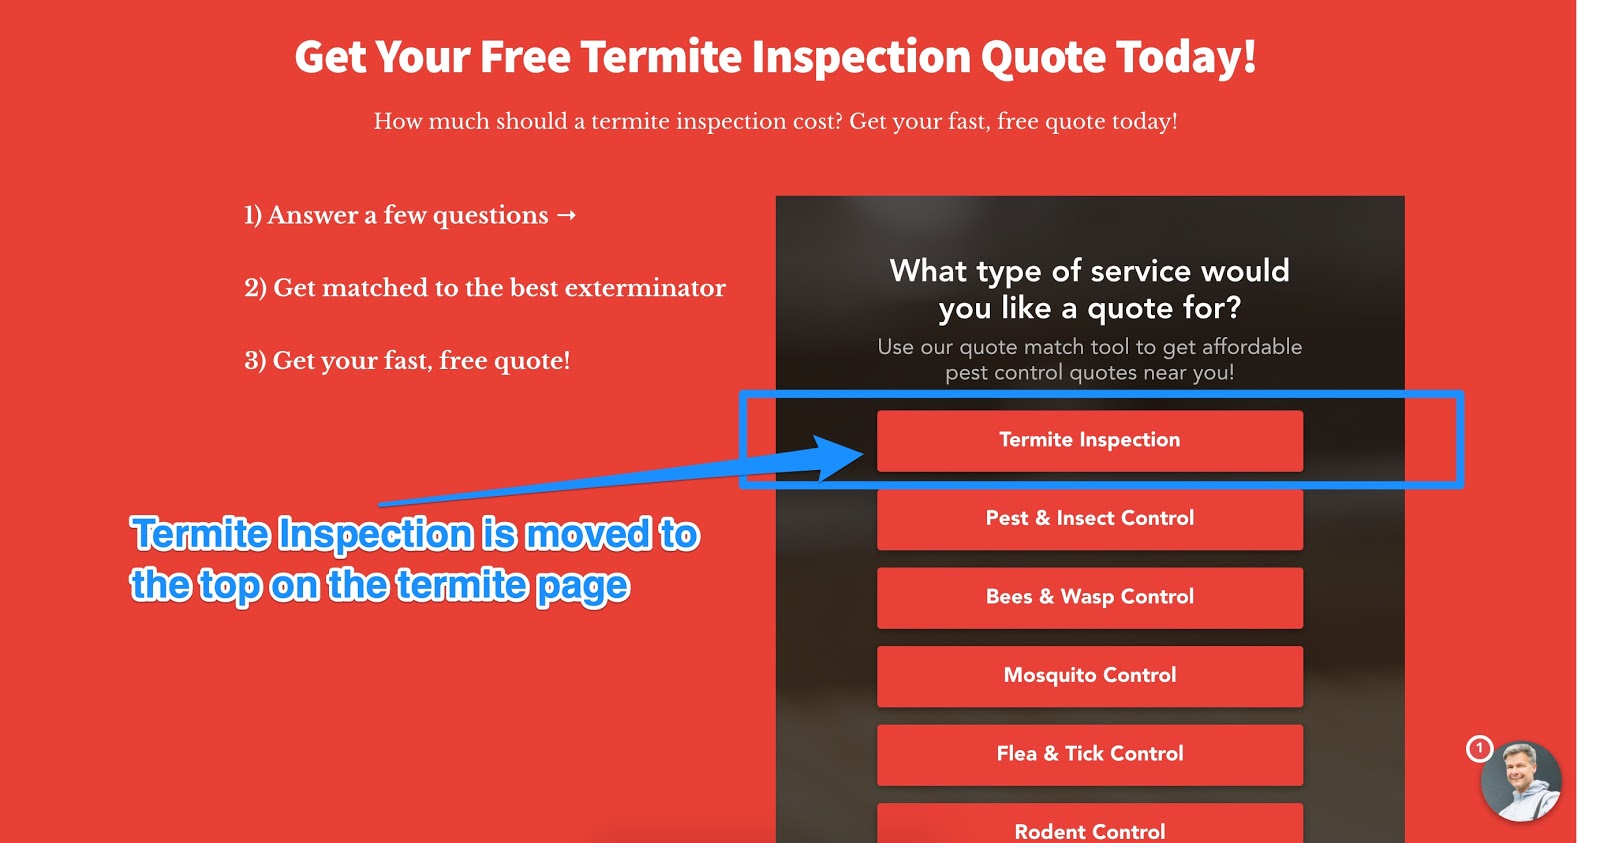
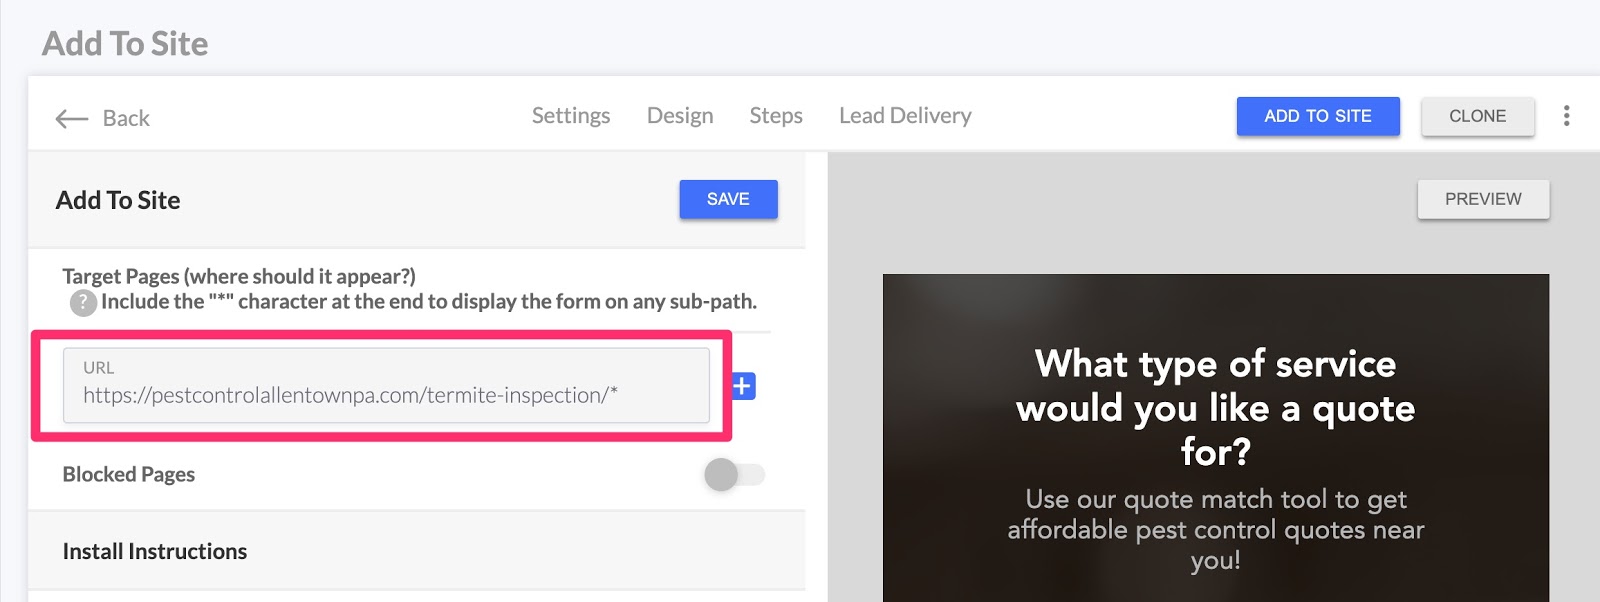
But things start getting interesting on my termite inspection service page.
Notice that the form starts with “termite inspection” at the top.
And the onsite message is even customized for termite inspection: “Having termite issues? We can help!”
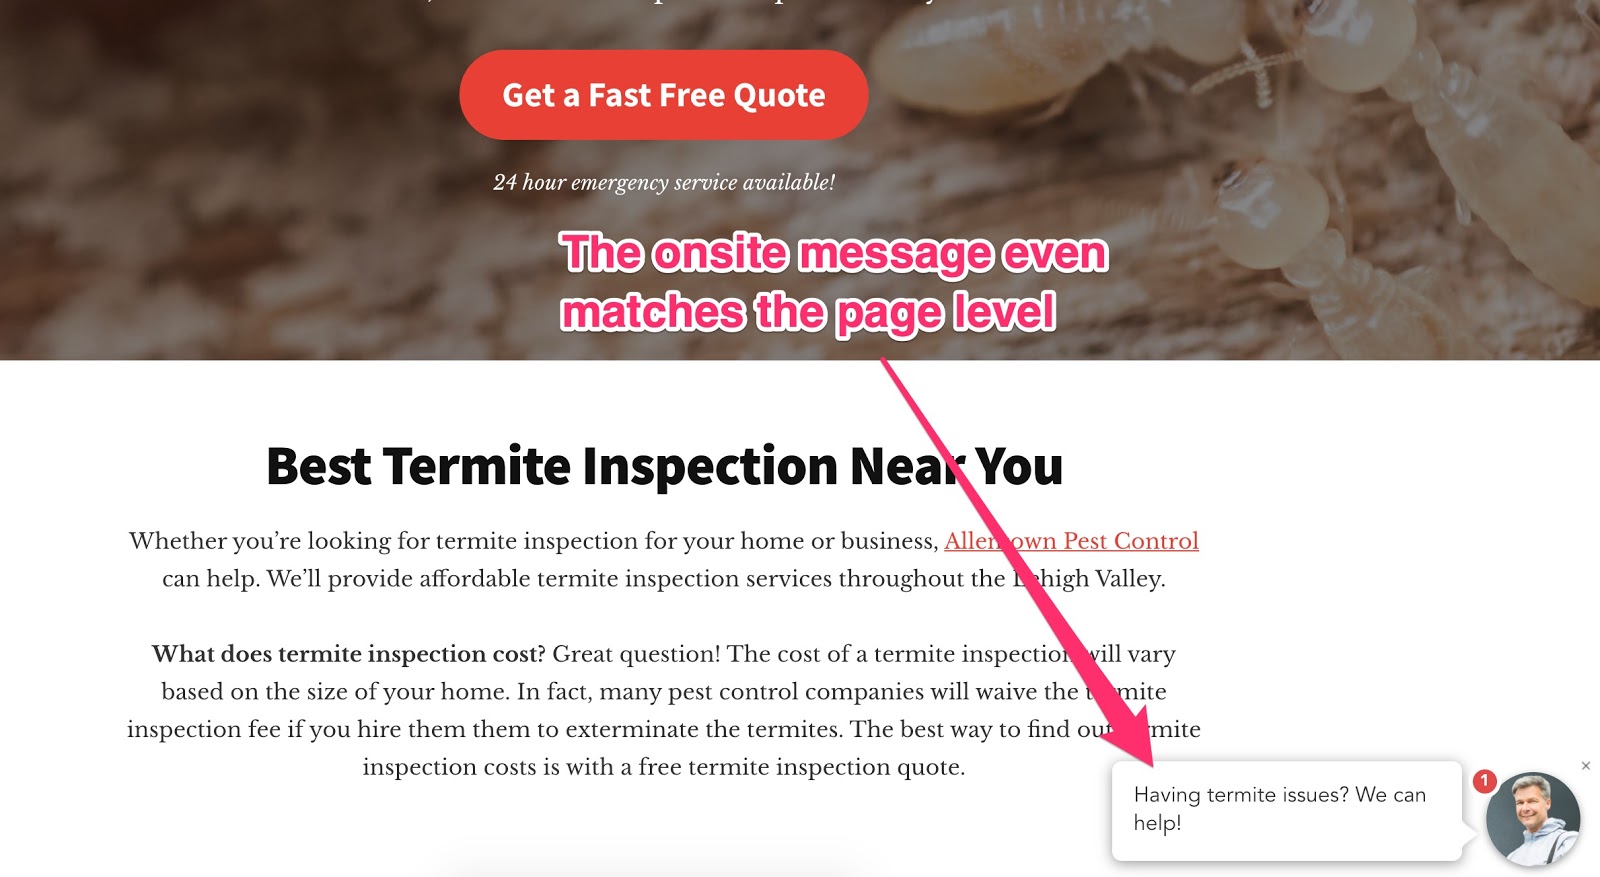
Since the visitor is looking at the termite page, we can assume that they probably are interested in a termite inspection service of some sort. Therefore, it makes sense to adjust the form a bit to meet the website visitor where they are in their journey.
And this doesn’t apply to just service businesses.
It works great for SaaS too. At LeadForms, we even use a different form on our pricing page to initiate more conversations with prospects who are lower in the buyer journey.
If you’re building your own HTML multi step forms, then I’d imagine that it would be quite a pain to setup forms like this. It might be better to turn to a “no code” solution like LeadForms.
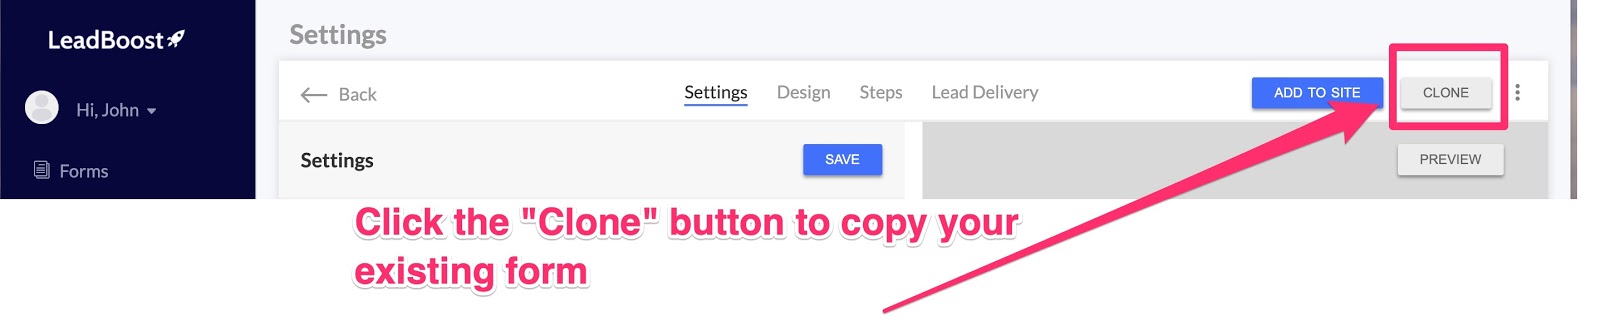
If you’re a LeadForms Customer, here’s how to do this inside of the LeadForms Dashboard.
- Clone your existing form
-
Once cloned, give the new form a name. In my example, I named the new form “Termite Inspection Form”
-
Adjust the steps to match the service page. Since I’m creating this for a termite inspection page, I moved “termite inspection” to the top of the list of service options.
!
- Finally, add the service page URL so the system knows to display the form on the service page only
Now, you don’t have to do all of this at the start.
You can easily have just one LeadForm across your entire site. I actually suggest to start with just one form, then slowly start rolling out dedicated forms for your top pages.
Finally… Ensure Freaky Fast Lead Delivery
I like to think of my leads as a pizza (my favorite food).

Source: giphy
The moment that the pizza comes out of the oven, the clock starts ticking.
The pizza needs to get from the kitchen to the customer’s mouth as fast as possible. Domino’s figured this one out with their 30-minute delivery guarantee — a topic for another time.
Except, when it comes to lead gen, you need to receive the lead even faster than you would receive a pizza.
Why?
As I discussed in a post about lead response time, if you wait just five minutes to respond to an inbound inquiry, you are 10 times more likely to lose that lead forever.
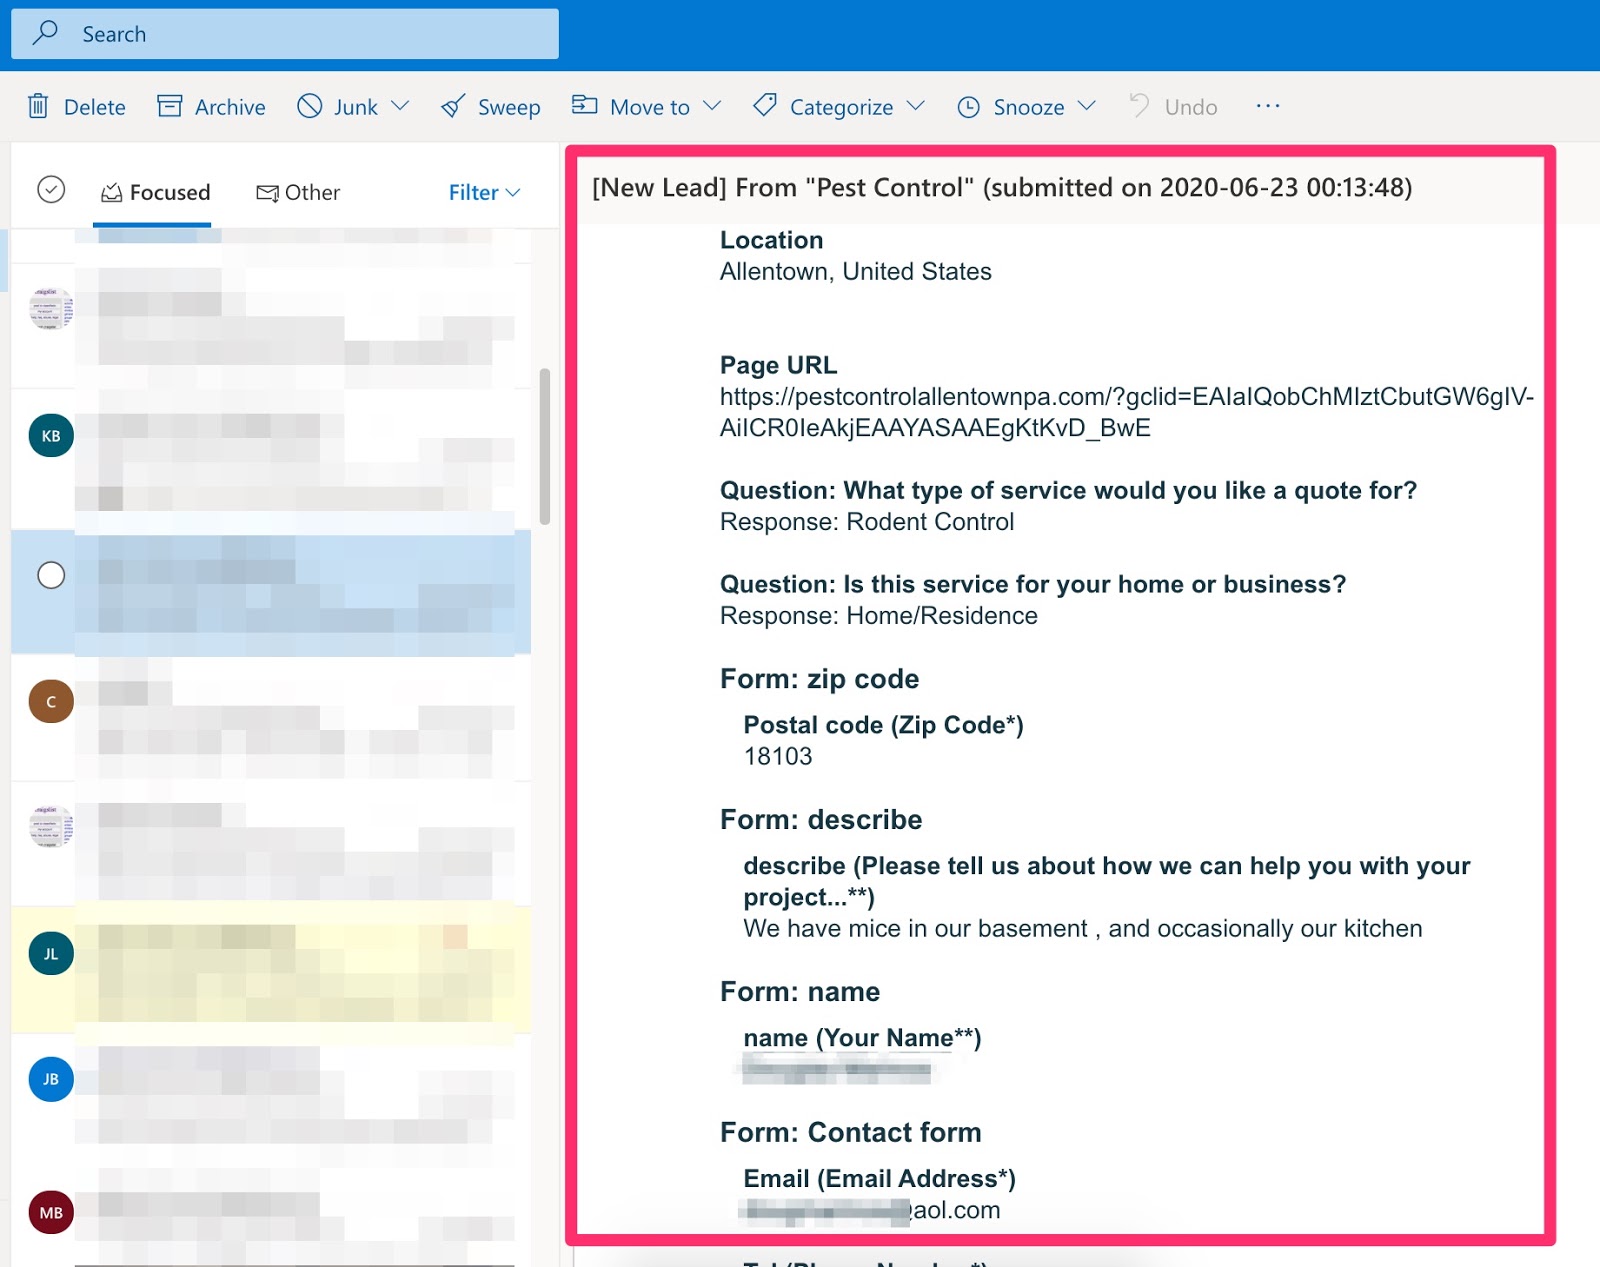
With the form in this example, I’m sending new leads to my client as both email and a text message to ensure that someone sees the lead as soon as it comes through.
Here’s an example of a real email notification, with the lead’s personal details hidden for obvious reasons:
And here’s the same lead, but sent via text message.
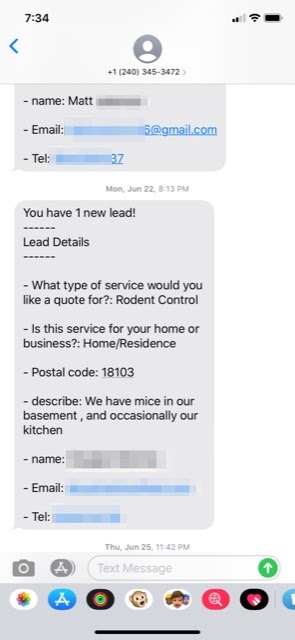
As you can see in the SMS notification above, all of the leads details are included in the text message, so you can easily follow-up from anywhere.
We already have all of this technology baked into LeadForms. However, if you’re not using LeadForms then you can hook up your forms using a service like Plivo — it will just take some work on your end.
What To Do Next: Check Out Our Multi Step Form Templates
Hopefully by now you have some pretty good insight into how to set up multi step forms that get results.
If you’re a LeadForms Customer:
I suggest using this post as a guide for how to setup and implement LeadForms on your website. You can find other helpful videos and walk-throughs here.
Not a LeadForms Customer?
If you’re not a LeadForms and you’re looking for a multi step form tool that will help you quickly deploy high converting forms without code, then you can sign up for a free trial, there’s no credit card required.
Want more examples of multi step forms?
For more inspiration and examples, check out our multi step lead form templates.
Ready to capture more leads?
Build and optimize high-converting lead funnels, quizzes, and forms with AI-powered lead capture software.
Start Free Trial