How to Easily Disqualify Leads by Zip Code for Better Lead Quality
If you (or your clients) only serves specific areas, don’t let out-of-area leads flood your pipeline.
If you (or your clients) only serves specific areas, don’t let out-of-area leads flood your pipeline.
In this guide, you’ll learn how to automatically disqualify leads based on ZIP/postal code – improving lead quality and saving time.
We’ll cover the problem of unqualified leads from outside your service region, two ways to tackle it, and a step-by-step look at how LeadCapture.io’s zip code/postal code disqualification system makes location-based lead filtering a breeze.
**Important Note:** If you’re seeking a straightforward solution for disqualifying leads by ZIP or postal code, look no further than LeadCapture.io. Our platform allows for effortless location-based disqualification without any need for coding or API integration. Learn more here.
Short on time? Watch this quick video to see how it works:
The Problem: Leads Outside Your Service Area
Imagine you’re generating leads for a service business – say a window replacement company in Toronto or solar company Denver – and you start getting inquiries from far outside your service region.
Suddenly, your lead inbox, CRM, and lead distribution tools are are cluttered with prospects you, your clients, or your lead buyers can’t actually serve.
Frustrating, right?
Many businesses face this exact problem: they serve specific geographic areas but receive leads from everywhere.
This leads to overwhelm, clutter, poor lead quality, and even increased CRM costs if you’re storing all those extra contacts. In fact, unqualified leads are widely known as a huge waste of time and resources. They clog up sales pipelines, slow down growth, and inflate costs per acquisition.
If you’ve ever had to wade through a list of leads only to find 20-30% of them are outside your territory, you know how inefficient it is. (One marketer noted that after a change in Facebook’s targeting options, 30% of leads generated fell outside the area served.
Not only do these out-of-area leads distract your sales team, but they can also drive up costs, especially if your CRM or marketing tools charge based on the number of contacts.
The bottom line: Leads that you can’t serve are hurting your business.
So what can you do? The solution is to improve your lead quality by filtering based on location before they ever hit your CRM or lead distribution tool. Specifically, by disqualifying leads based on their ZIP or postal code (whether in the US, Canada, UK, etc.), you can ensure your clients only talk to people in your service area.
Let’s look at the possible approaches to achieve this.
Two Approaches to Filtering Leads by Location
There are a couple of ways to handle out-of-area leads.
Some businesses take the “catch-all” approach and then deal with cleanup late, or maybe even resell their leads to other provider if they’re lead sellers using a tool like LeadByte.
Others prefer to nip the problem in the bud with automation in the form.
Let’s break down these two approaches:
Option 1: Accept All Leads and Filter Later (Manual & Inefficient)
One approach is to accept every lead that comes in, regardless of location, and then manually sort or filter them on the back end (in your CRM or lead distribution system).
For example, you might have someone on your team review each lead’s address and mark unqualified ones as “out of area” or exclude them from routing to sales. Alternatively, you might set up a CRM workflow to tag leads with non-local ZIP codes and either delete them or put them in a nurture bucket.
While this is doable, it’s not ideal, unless you plan to sell the leads to someone who can service them.
Manually filtering leads is time-consuming and costly. It means you or your team have to spend time reviewing each lead or maintaining complex rules in your CRM. Plus, by the time you’ve identified an out-of-area lead, it’s already in your system cluttering up your data. You might be paying for that lead in more ways than one. Whether it’s actual CRM contact fees or the opportunity cost of your sales team’s time. In short, this approach treats the symptom (“too many bad leads”) after the fact, rather than preventing it up front. It’s like letting junk mail pile up on your desk and then sorting it, a productivity killer.
Clearly, a better solution is needed.
Option 2: Disqualify Leads by ZIP Code in Real Time (Automatic & Seamless)
A smarter approach is to filter out unqualified leads at the point of capture, automatically.
This means when a prospect fills out your lead form, you check their ZIP or postal code as they submit and prevent the ones outside your area from ever being recorded as leads.
Essentially, the form itself says: “Oops, looks like you’re outside of our service area” and kindly stops the process for those folks. Qualified leads (in-region) go through as normal, while out-of-region leads are politely turned away before they clutter your database.
This real-time disqualification by ZIP code is far more efficient. It ensures only high-quality, location-appropriate leads reach your CRM or lead distribution system. Your sales team or clients won’t even see the out-of-area entries. The process is seamless for the user too – they get an immediate, friendly message instead of being left hanging or ignored later.
Automating lead filtering by location allows you to instantly sort qualified vs. unqualified prospects. Rather than manually sifting through every submission, an automated form can do the work for you – flagging leads with acceptable ZIP codes (✅) to continue, and stopping those with disqualified ZIPs (❌) right away. This keeps your pipeline clean and focused on real opportunities, without any awkward “Thanks, but we can’t serve you” phone calls later. The result is a smoother experience for both your team and the prospect.
Modern form and funnel tools (like LeadCapture.io) have introduced this capability to prevent unqualified leads from moving forward if they’re outside your service area.
How to Automatically Disqualify Leads by ZIP Code with LeadCapture.io
LeadCapture.io makes it super easy to implement real-time ZIP code filtering, without needing any complex integrations or third-party APIs. You don’t have to write custom code, use Google Maps, or do anything fancy – it’s a simple setting in your lead form builder.
Our platform supports multi-step forms and funnels, which are perfect for qualifying leads as they go (you can ask for the ZIP code on one step and handle disqualification right then and there).
Let’s walk through how you can set this up, step by step.
For example, imagine your service area is around Denver, CO__.
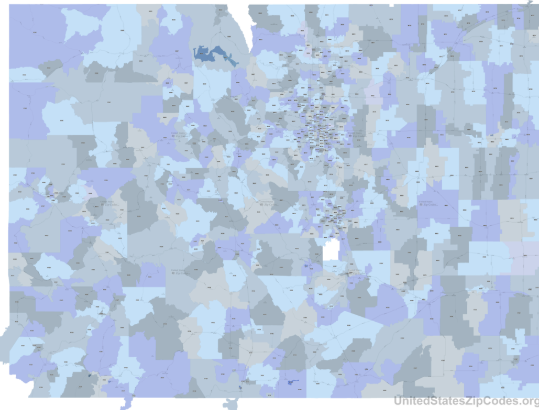
The map above shows all ZIP code regions in Colorado – notice the dense cluster of ZIP codes around Denver (center of the map).
Those are the ones you’d want to accept, while the rest (outside the metro) should be filtered out. By compiling the Denver-area ZIP codes and uploading them into your form’s settings, you can automatically disqualify any lead whose ZIP falls outside that cluster. This way, someone from, say, Colorado Springs or Grand Junction (farther areas on the map) won’t become a lead by mistake.
Now, here’s how you set it up in LeadCapture.io:
Step 1: List the ZIP/Postal Codes You Serve.
First, determine exactly which ZIP codes (or postal codes) are within your service region. If you operate in the U.S. this might be a set of 5-digit ZIP codes; in Canada, postal codes; in the UK, postal codes, etc. Make a master list of all the codes you want to accept. (If you don’t already have a list, no worries, you can generate one easily.
For instance, you could ask ChatGPT or use an online tool to list all ZIP codes in your city or county.
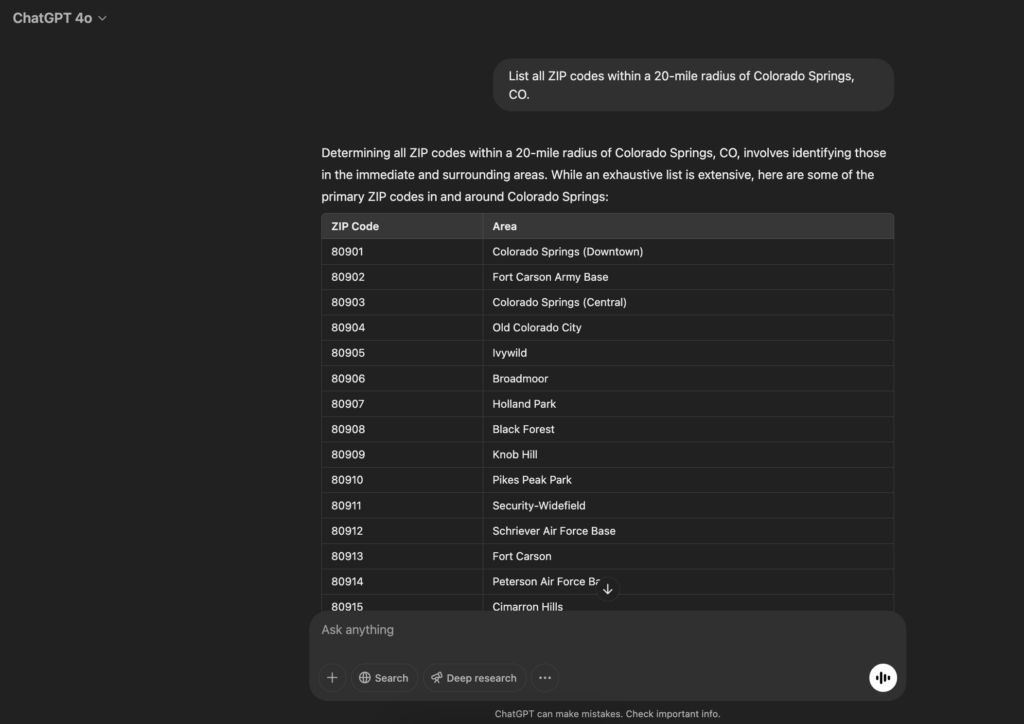
💡 Pro tip: literally ask _“What ZIP codes are in Denver, CO?” or “_List all ZIP codes within a 20-mile radius of Colorado Springs, CO. And you’ll get a quick list that you can copy.) The goal here is to have a comprehensive list of the locations you actually serve.
Step 2: Format the Codes as a Comma-Delimited List
Once you have your target ZIP/postal codes, convert them into a comma-separated format (e.g. 80201, 80202, 80203, ... and so on). LeadCapture.io accepts the list in a comma-delimited string, so it can check each incoming lead’s entry against this list.
Ensure there are no typos and that the formatting is correct (it’s usually straightforward – just one code, a comma, then the next code, etc.).
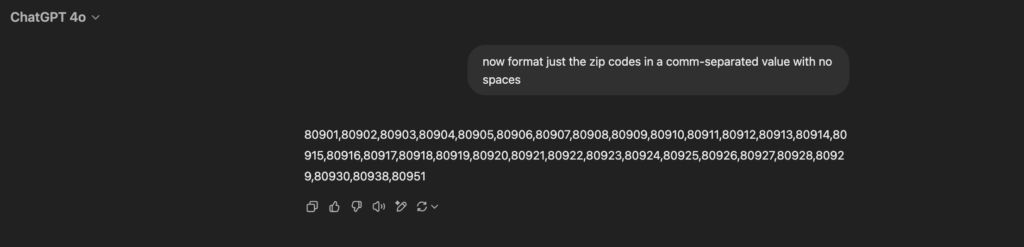
If you got the list from a tool or ChatGPT, you might just need to do a little clean-up or formatting, which typically takes only a minute.
Step 3: Enable “Disqualify Based on ZIP Code” in LeadCapture.io
Now, log in to your LeadCapture.io dashboard and open the lead capture form (or funnel) you’re using to collect leads.
Add a ZIP/Postal Code field to your form (if you haven’t already) – this might be one of your multi-step form questions, likely right after you ask for the prospect’s basic info.
Click on the ZIP code field to edit its settings.
Here you’ll see an option labeled “Zip Code Verification List” click on the tiny pop up icon to open up the window at add your list.
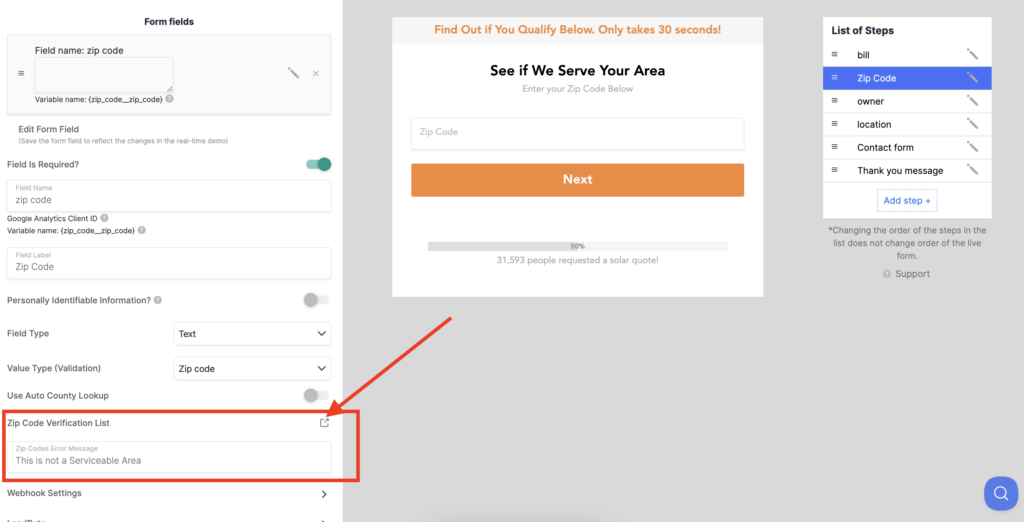
When you do, it will allow you to upload or paste the list of allowed ZIP codes you prepared in step 2. Go ahead and upload the list or paste the comma-separated values into the provided field.
Essentially, you’re telling the form, “if the entered ZIP isn’t in this list, consider the lead unqualified.” (Under the hood, the system will now check each submission against your allowed list and automatically block those that don’t match.)
Step 4: Set a Friendly Disqualification Message
When you enable the disqualification setting, LeadCapture.io will let you define a message to show users who enter a ZIP code that is not on your allowed list.
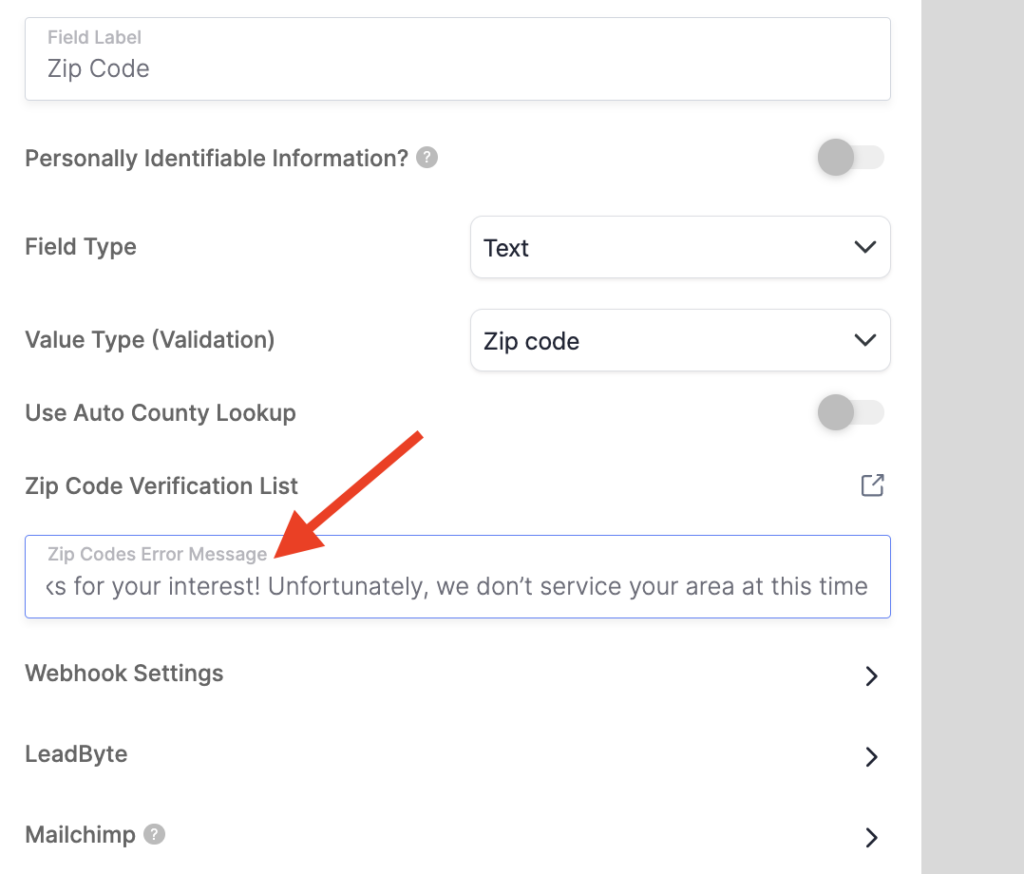
This is your chance to let them down easy 😇.
You might write something like: “Thanks for your interest! Unfortunately, we don’t service your area at this time.” Keep the tone polite and helpful. You could even suggest an alternative or provide a link (for example, “Check out our partner directory for providers in your area” or “Subscribe to be notified if we expand to your region”).
A friendly message ensures that even the leads you turn away still have a good experience with your brand. Once you’ve written your disqualification message, save your lead form.
That’s it – you’re done! 🎉 You’ve now set up your lead capture form to automatically weed out leads by location.
For example, you’ll see below when I entered a zip code that’s not in a serviceable location, the verification failed in real time and a friendly message was presented to the prospect.
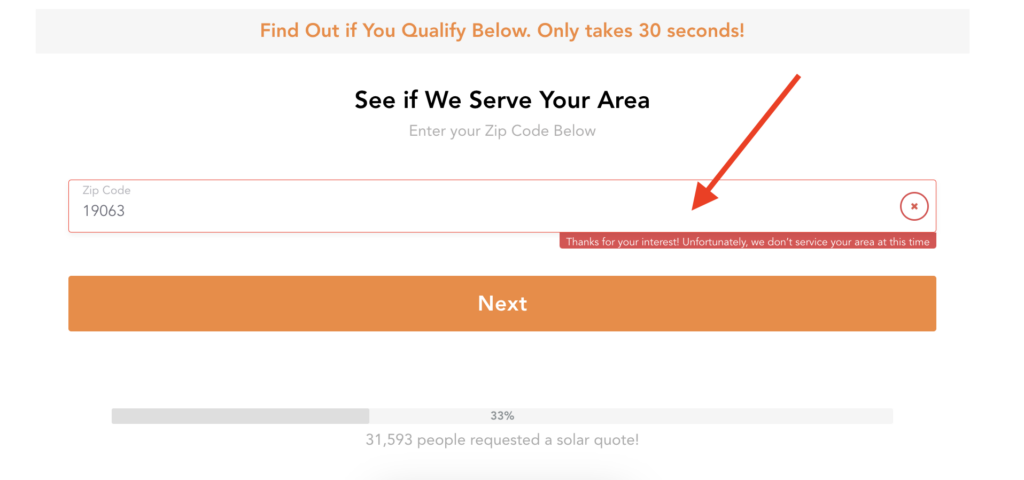
Going forward, anyone who tries to submit the form with a non-approved ZIP/postal code will see your custom message and will not be added to your lead list. Meanwhile, those within your service ZIP codes will proceed through the form normally, and you’ll receive them as leads. The whole process is seamless.
Wrap-Up: Disqualify, Unqualified Leads Based On Your Location, No Coding Required
By disqualifying leads based on ZIP code at the point of capture, you’ve effectively turbocharged your lead quality. This simple setup means you no longer have to worry about piles of useless leads from outside your area wasting your time or money.
LeadCapture.io’s built-in ZIP code filtering does all the heavy lifting for you in real time, so your team can focus on genuine opportunities.
The beauty of this solution is its simplicity. There’s no need for complicated integrations or third-party geolocation APIs to validate addresses, you just upload the list of acceptable areas into LeadCapture.io and it handles the rest. In fact, LeadCapture.io added this feature specifically to help lead sellers, agencies, and lead generators “capture better leads with more precision”, allowing you to prevent unqualified leads from moving forward if they’re outside your service area.
Want to give it a try? You can get started with LeadCapture.io here.
Ready to capture more leads?
Build and optimize high-converting lead funnels, quizzes, and forms with AI-powered lead capture software.
Start Free Trial